
MODA BLOCKHEADS 5: Week 2
It’s week TWO…and what’s even better than that? It’s my turn to share!
And in case you missed our WEEK 1 BLOG POST, be sure to check it out! Lots of information on how we chose our fabric palette for the quilt, plus tips on how to choose fabrics for individual blocks. Thanks again to Betsy Chutchian for a beautiful BRIGHT STAR block to get us started!
And now…
GALAXY STAR
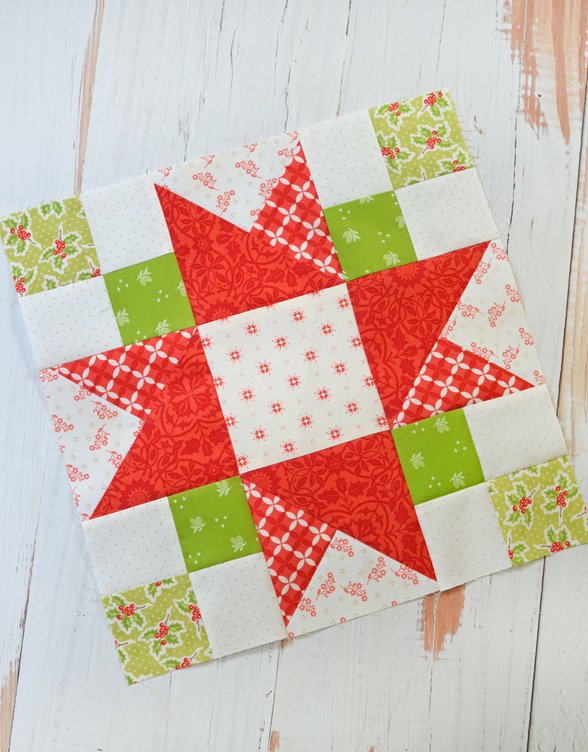
Like so many of us, I absolutely love the design of so many different star blocks, from the classic, simple ones to the most intricate feathered stars. This GALAXY STAR block [Moda pattern sheet available HERE] is one of my favorites that I have used several times over the years because it uses only a few techniques AND its fabulous secondary pattern created when used on its own. More on that later in this post!
OUR BLOCK

If you are following along with us in using a Christmas theme…
Choosing Fabrics:
- (3) cream prints
- (2) red prints with enough variation in tone or amount of white in the prints [which makes them feel different and they don’t “fall into” one another as much]
- (2) green prints [the best is if one is a ligher/warmer green and one is a brighter “greener” green

Cutting/Piecing Instructions:
This week, I am showing you an alternate way to make the split quarter square triangles (QSTs), from steps 2 & 3 of the MODA pattern sheet. If you’ve followed me for awhile, you already know that I often use the SEW & FLIP method for half square triangles (HSTs), flying geese units, etc. to avoid a lot of bias edges. I have a similar “go-to” for QSTs after many years of trying LOTS of different methods!
For 6″ Block –
- Cut (1) 3 1/4″ square from both the cream and accent red [D & E from the MODA pattern sheet].
For 12″ Block –
- Cut (1) 5 1/4″ square from both the cream and accent red [D & E from the MODA pattern sheet].
Cut these squares on each diagonal, to end up with 4 pieces from each. If you look at the diagram below, you can see that once pieced, this method ensure you have no bias along the block edges. When working with bias, you want to:
- Have as little of it as possible [whenever you have the choice, that is]
- If you have to have, make sure it is on an “inside” edge or seam and not along the outside of your unit or block
- Handle it as little as possible until it has been pieced in
- Be sure to “press” it and not “iron” it to avoid any stretching
For the reasons above, I will always opt for this QST method when having this kind of a pieced unit, instead of just cutting the square in half and having that bias edge exposed on the outside of my block.
All other cutting directions are as indicated in the MODA pattern sheet, and you will still have room to trim down to correct size! Line up your quarter square unit on the large triangle, centering if it is a bit larger and then trim down to 4 ½” [for the 12″ block] or 2 ½” [for the 6″ block].
And an extra tip/hint to file away…
The formula for cutting HSTs is always 7/8″ more than the finished size. For me, I ALWAYS do a full 1″ more than the finished size and then that gives me just a little bit to trim down to the perfect HST!
The formula for cutting for QSTs is 1-1/4″ larger than finished size. And if you want trimming up space, then even a tiny bit more than that would be recommended.

Fabric Collections:
- Center cream w/red star: Stitched
- Red tone-on-tone mosaic: Christmas Stitched
- Red criss cross: Fresh Fig Favorites
- Green pinecone: Christmas Stitched
- Green holly: Christmas Figs II
- Cream w/tan dot: Fresh Fig Favorites
- Cream w/red floral: Linen Cupboard [arriving this November!]
GALAXY STARS QUILT INSPIRATION
I mentioned in the pattern sheet that one of the things I loved most about this block is the secondary pattern that is created when it is used in repeat. So I thought I would show you what I meant!
Here I used the same block in the 12″ size from today and repeated it 12 more times. I used (6) of my favorite small cream prints for some scrappy variety and cut (2) 12 ½” squares from each of them.
I added a 3 ½” cut border all the way around and bound in green! I LOVE LOVE the green chain that appears throughout the quilt. This is what I mean about loving “secondary patterns” that are created from certain blocks… they just add that special something to even a simple project.

MY BLOCKHEADS SETTING
I have also gotten LOTS of messages and emails about whether or not there will be a Fig Tree setting for this quilt and I am happy to announce that the answer is YES! We will definitely have a special setting, but more on that in a few weeks once the program gets going a little bi,t and we all have a few more blocks under our belts.
Anything else you need to know about that? Well…for our setting we will be making the more complicated/complex blocks as the 12” versions. We will be making all of the more simple blocks as 6” versions, then combining the blocks from Round 1 and 2 together to create one large Christmas lap/throw! That’s all I know for now, but stay tuned for more info soon!
MODA QUICK LINKS
For ALL the details and specifics on Moda Blockheads 5, I encourage you to visit these useful resources:
MODA BLOCKHEADS 5 FAQs AND FABRIC RECOMMENDATIONS
INTRO TO MODA BLOCKHEADS 5 LIVE VIDEO [REPLAY]
BLOCKHEADS LIVESTREAM RECAP BLOG POST
MODA BLOCKHEADS FACEBOOK GROUP
And last, but certainly not least, the MODA BLOCKHEADS 5 BASIC PAGE – this is where ALL the block patterns will be saved for easy reference as we move forward!
Happy sewing! See you back here next week for block 3!
-Joanna
Deb Forfia | 20th Sep 23
I have not started my blockheads five yet because I’m struggling with the six and 12 inch blocks. The first block is too complicated for me to do a 6 inch block. Your block I could perhaps accomplish a 6 inch block. i’m very interested in your setting, which would mix size is based on the complexity of the block. Will you indicate as we go which blocks are 12″ and which 6″ or how many of each will work with your setting? I’m assuming the blocks 1 and 2 (not bonus 1) are the more complicated 12 inch blocks. Thank you.
joanna@figtreequilts.com | 20th Sep 23
Yes, once we have more blocks under our belt, we’ll have a better idea on our layout and offer some more info to everyone!
Lynn L Young | 20th Sep 23
Thanks so very much for correcting the cutting for C & D, I would have not been a happy piecer with all that bias!!! Would have muttered many ********.
Your hints/instructions on cutting triangles needs to be a pdf that everyone prints and saves, GREAT INFORMATION! especially for those who never made templates and had to know the 5/8 inch rule for seam allowance!!!
I also love all your background prints you include in your collections!
joanna@figtreequilts.com | 20th Sep 23
You are so welcome, happy to help!
Stephanie Hironimus | 20th Sep 23
I was considering both 6″ & 12″ blocks, so I’m excited to see your setting, Joanna.
joanna@figtreequilts.com | 20th Sep 23
Fantastic! Our setting might just be the ticket.
Moda Blockheads 5 Block 2 - Treeline Quilting | 23rd Sep 23
[…] 2 is designed by Joanna Figueroa of Fig Tree & Co. The Galaxy Star block is made with four patch corners and quarter square triangles for the edges. […]