
CHRISTMAS IN JULY: ADVENT CALENDAR TUTORIAL
Welcome back to CHRISTMAS IN JULY… our month long celebration of sewing!
Today’s fun idea and free tutorial comes to you from my Figgy Friend, Lacey [@laceypoirier]. It is in the SEWING CATEGORY for those of you looking for new and interesting ways to use our VILLAGE BORDER PRINT or any of the BUON NATALE prints, really, if you can’t get your hands on the village print.
……
SUPPLIES FOR THE ADVENT CALENDAR
MATERIALS LIST:
- 2/3 yd. Village Border Print
- 2/3 yd. Backing Fabric
- 1/3 yd. Binding Fabric
- 1/2 yd. Main Pocket Fabric
- 1/4 yd. Accent Pocket Fabric
- Soft & Stable Foam Stabilizer
OTHER EMBELLISHMENTS USED:
- Craft Tags
- Michaels: Recollections Tags 2.5″ x 5.1″ [Item # 241011]
- BUON NATALE Renaissance Ribbons
- BUON NATALE Fabric Scraps [Treat Bags]
- Twine
- Hinge Clips
……
TUTORIAL HOW TO

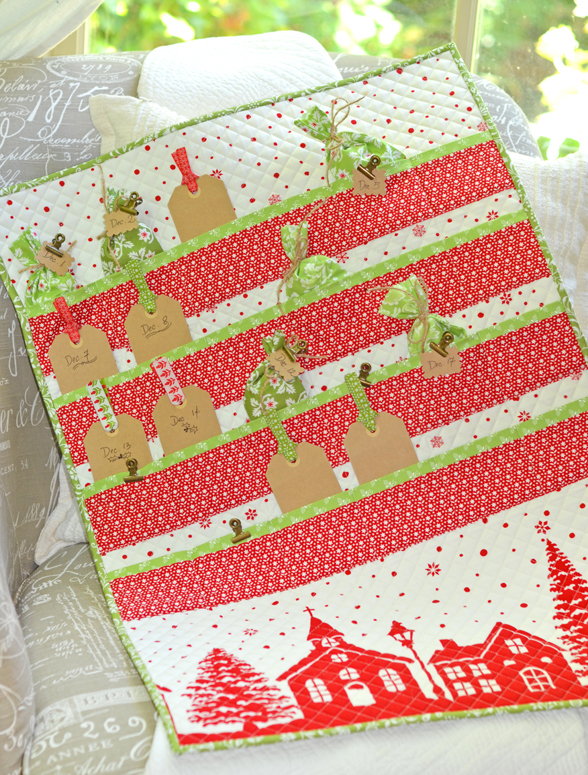
- For your quilt top, rough cut a piece approximately 23″ x 32″, ensuring you capture one full village border print edge to feature at the bottom of your advent calendar.
- Create a quilt sandwich with your Soft & Stable and quilt as desired.
- You can, of course, use regular quilt batting, but we prefer Soft & Stable as it provides a sturdier calendar for filling with Christmas goodies!
- Trim your quilt to 21 1/2″ x 30 1/2″.
- To create your pocket rows, cut:
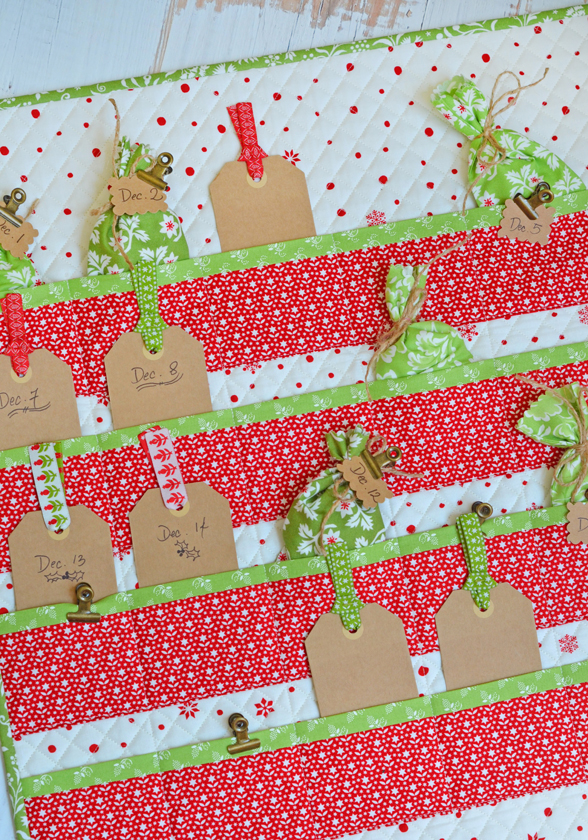
- (4) 5 1/2″ x 21 1/2″ MAIN POCKET rectangles
- (4) 1 1/2″ x 21 1/2″ ACCENT POCKET rectangles
- With right sides together, sew an accent pocket fabric rectangle to a main pocket fabric rectangle using a 1/4″ seam. Press open. Then, sew the unfinished edge of the main fabric to the unfinished edge of the accent fabric, creating a “tube”. Sew with a 1/4″ seam, press open, and then flip your tube right side out. Decide how much of your accent fabric you want showing, then press to create a 3″ x 21 1/2″ pocket row. Repeat (4) times.
- Measure 10″ up from the bottom of your calendar top and, using a heat-erasable marking pen [FRIXION], draw a horizontal line for the bottom edge of your fourth pocket. Then, continue marking (3) additional horizontal lines, one line every 4″ up.
- Remember: these temporary lines will be used as a reference to line up the BOTTOM of your pocket rows.
- One at a time, lay your pocket row along the drawn line and stitch 1/8″ from the pocket bottom edge to secure. Stitch 1/8″ from the left and right edges, as well to hold pockets in place. Continue with all (4) pockets. Press to remove any remaining markings.
- Each pocket row will contain (6) pockets that are 3 1/2″ wide. You must also account for the 1/4″ on each edge for binding. To do so:
- Starting at the left, measure over 3 3/4″. Draw a vertical line from the TOP of the 1st pocket all the way to the bottom of the 4th pocket. Then, continue marking vertical lines 3 1/2″ apart (4) more times. You should then have an additional 3 3/4″ at the right to account for the 6th pocket.
- Sew on these drawn lines to create your individual pockets. Ensure you backstitch at the beginning and end, as well as at the TOP of each pocket for extra durability.
- Prepare and attach your binding all the way around the whole calendar.
……
FOR HANGING
There are several options for hanging your Advent Calendar. It really depends on how much use you expect it to get…

If it’s more for decoration than play, you could simply use thumbtacks in each corner for a temporary solution over the season.
OR you could also add a quilt sleeve to the back and hang with a dowel.
OR you could attach grommets and hang with nails or 3M hooks [this is what Lacey plans to do].
The choice is yours!
Gosh I think this will look so cute when each pocket is all filled up with goodies!
……
GOODIES, TREATS, & COUNTING CALENDAR DAYS
This is also totally customizable! Here’s what Lacey plans to do:
Use craft tags to write the day at the top [1, 2, 3, etc.] and then on the part of the tag that is hidden in the pocket, write a fun activity to do as a family!
She is finishing the tags off with our BUON NATALE COORDINATING RIBBONS from Renaissance Ribbons. Aren’t they adorable?!
IDEAS:
- Movie Night
- Sing Christmas Carols
- Bake Cookies
- Make Paper Snowflakes


She also created mini reusable fabric bags to hide goodies. You can tie with ribbon or twine to keep it hidden…or simply place some chocolates and candies in just as they are. Create your own numbers for the pockets and attach with hinge clips…or get fancy and create wool numbers appliqued to each pocket?!
Seriously, the ideas are endless – make it your own and enjoy!


……
Happy Sewing,
-Joanna & Lacey