
IT’S SEWCIALITES TIME
It is my week on the FAT QUARTER SHOP sponsored SEW ALONG called SEWCIALITES. This is the second year of this program and it is always so much fun to see what each designer contributes and how FQS lays it all out.
Each week a different designer shares one of her favorite blocks and all of the info on how to make it in one of three sizes is on the FQS Blog, Jolly Jabber. The folks at the Fat Quarter Shop are working all of the blocks into a sampler so check that out. Read more about Sewcialites HERE.
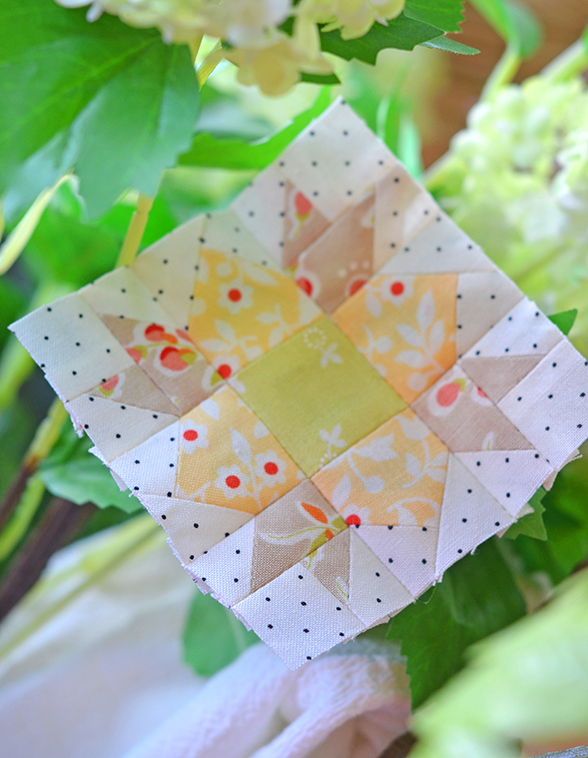
This week is my block, INVIGORATE, and this is one of my all time favorite blocks. I have made it in so many different variations and often include it in my Fig Tree BLOCK OF THE MONTH programs too. There is something about this block that is the perfect blend of interesting and simple. It showcases fabric of pretty much any style and is not too complicated to assemble. Traditionally it is called the Weathervane block and it was the first block I thought of when FQS asked me for a contribution to their program.
Here is the link to the directions for the block and all the info…. CLICK HERE.
For my block this week… we have done a few things, so come and see some fun options.
JOANNA’S PINCUSHION
I decide to make the 3″ block… because, you know, who wouldn’t like a 3″ block of anything. And OH MY GOODNESS.. it came out so darn cute.

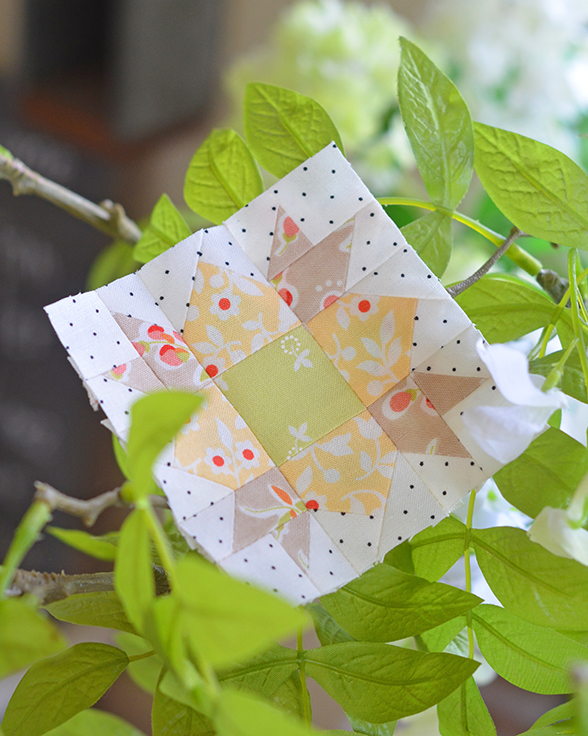
But then of course a 3″ block by itself felt like it needed some finishing so I turned it into the cutest little pincushion. I may have mentioned before a dozen million times that I am ALL ABOUT the pincushions.

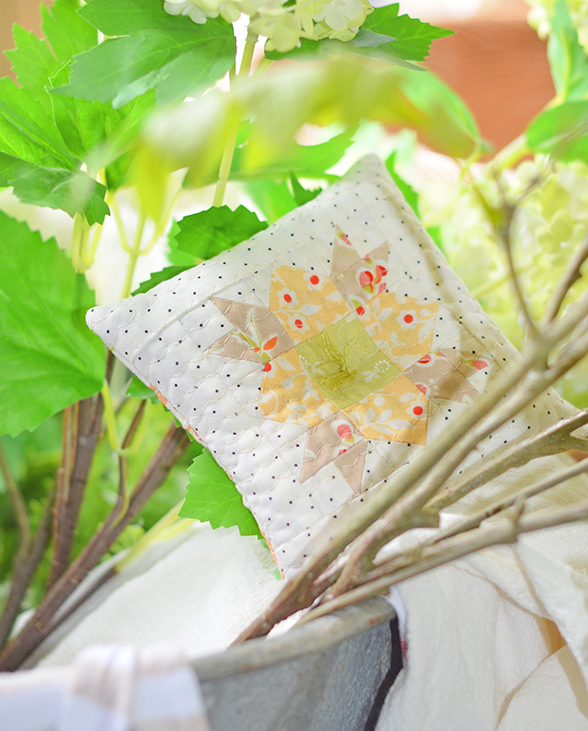
This is what I did:
- I added a 1 ¼” cut border around the outside of my block [so that would be (2) pieces 1 ¼” x 3 ½” and (2) 1 ¼” x 5″].
- I added a piece of fusible fleece to the back. You could also glue a piece of batting to the back but I love the fusible fleece for its ease and structure. I use Pellon 987F.
- Then I zigzag quilted it on my regular machine. If you search for zigzag here on the blog, you will find a post with a bit more info on how I do the zigzag quilting on almost all of my little sewn items that need to be quilted.
- Then I cut a 5″ square of floral fabric, added a piece of fusible fleece to that too and quilted that. That is my pincushion back.
- I sewed the two together RST, leaving a 2″ opening on one side. I turned it RSO, pushed all of the edges and corners out with my wooden turning tool.
- I filled it with crushed walnut hulls [ otherwise known as “lizzard litter” at the pet food store] but made sure it was “loose” because I knew that I was going to squish in the center when I was done and I needed enough “give” to do that.
- I whipstitched the side opening shut.
- With a long needle, I threaded about a 6″ length of green embroidery floss through the center, tied it up on the top and trimmed it up. I “fluffed” up the ends and voila!
SUSAN’S TABLE TOPPER
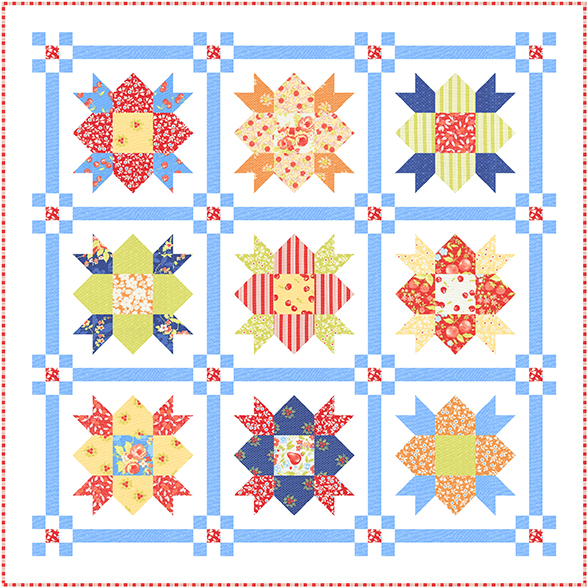

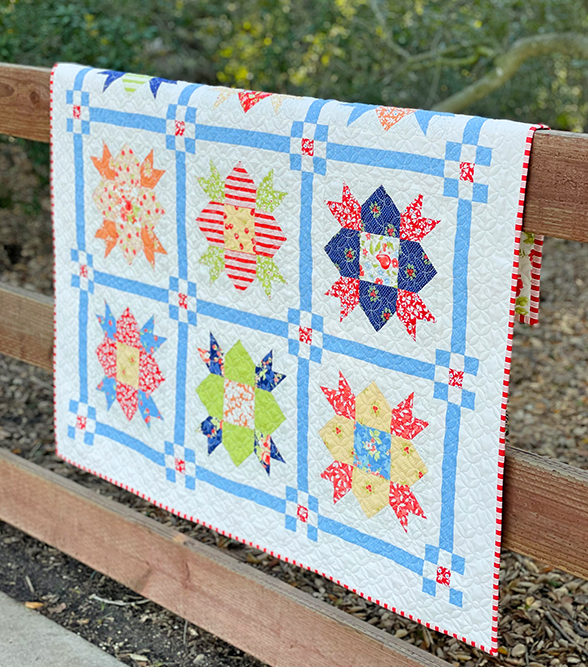
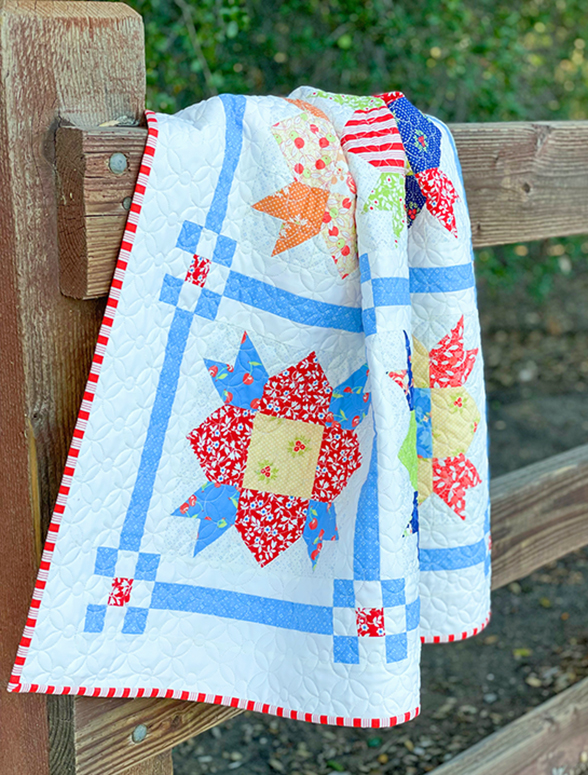
When Joanna shared with me her Invigorate Block for Sewcialites 2, I immediately saw them made up into a cute topper for my kitchen table. Our kitchen table is the heart of our home. It is where we enjoy our morning coffee – sharing goals for the day, where I watch my daughter start her homework after getting all the “tea” from her day at school, and where we spend a few minutes reconnecting after dinner as a family. It’s a special place, and I love decorating it with a topper or runner to make it inviting and welcoming. For this project, I opted for a classic Rail and Nine Patch setting to compliment the blocks for the perfect mix of fresh and nostalgia all combined together.
YARDAGES
- ½ yard Light Blue Print
- 1/8 yard Red Print
- 1 1/8 yard Background Solid
- 3/8 yard Red Strip for Binding
- 2 1/4 yard for Backing
CUTTING INSTRUCTIONS
- From Light Blue Print: Cut (10) 1 ½” by WOF Strips
- From Red Print: Cut (1) 1 ½” by WOF Strip
- From Background Solid:
- Cut (16) 1 ½” by WOF Strips
- Cut (5) 2 ½” by WOF Strips for Borders
PIECING & ASSEMBLY DIRECTIONS
MAKE BLOCKS
- Make (9) Invigorate Blocks, or substitute your favorite Sewcialites Blocks.
MAKE SASHING BLOCKS
- Sew (1) Light Blue Print strip between (2) Background Solid strips to form a strip set.
- Press towards the Light Blue strip. Make (6).
- Subcut each strip set into (4) 3 ½” x 9 ½” unfinished sashing blocks for a total of (24) sashing blocks.
MAKE POST NINE-PATCHES
- Sew (1) Background strip between (2) Light Blue Strips to form a strip set. Press towards the Light Blue Strips. Make (2). Subcut into (32) 3 ½” x 1 ½” units.
- Sew (1) Red strip between (2) Background strips to form a strip set. Press towards the Red strip. Make (1). Subcut into (16) 3 ½” x 1 ½” units.
- Combine (2) Light Blue units with (1) Red unit between to form a Nine Patch Block. Block measures 3 ½” square unfinished. Make (16) Post Nine Patch Blocks.
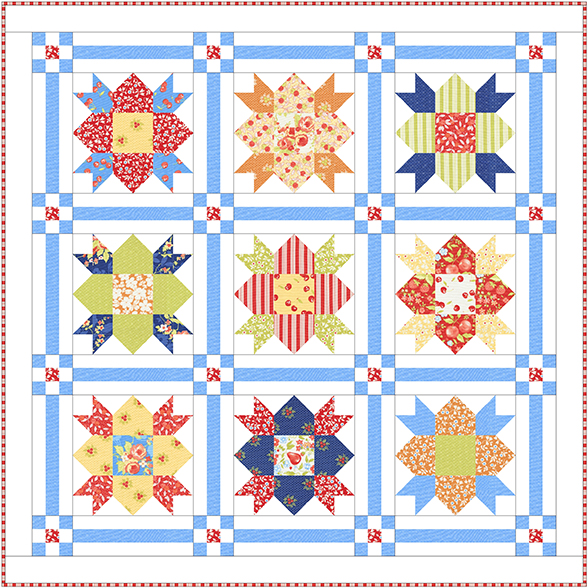
ASSEMBLY
- Trim (2) 2 ½” strips to make (2) 2 ½” x 39 ½” Left/Right Borders.
- Combine remaining strips together and cut (2) 2 ½” x 43 ½” Top/Bottom Borders.
- Lay out blocks with sashing and nine patch blocks as shown.
- Combine (4) Nine Patch post blocks with (3) Sashing blocks to form a row. Press towards sashing blocks. Make (4) rows.
- Combine (4) Sashing Blocks with (3) Invigorate Blocks to form a row. Press towards sashing blocks. Make (3) rows.
- Combine rows to make quilt top.
- Attach Left/Right Border and then Top/Bottom Borders. Press out.
- Layer, baste and quilt as desired. Susan chose an all over orange peel inspired design.
- Bind with (5) 2 ¼” strips.
*To make the most use out of your backing fabric combine the Back as follows:
- Cut Backing fabric into (1) 52” x WOF cut and (2) 12” x WOF cuts.
- Sew (2) 12” WOF cuts into one long strip and trim to 12” x 52” piece.
- Sew 52” pieces together to form back.
LACEY’S RUNNER
Joanna asked me to join her on this week’s Sewcialites 2 block, and you better believe I said YES! After seeing the block, I immediately envisioned a runner of sorts. I am also very fond of flying geese borders that I see incorporated into many Fig Tree patterns, so I sat down with pen and paper and made some notes. Once I felt satisfied with my [very rough] design layout, I dove into my scraps and picked one of my favorite fabric combos – aqua & red – and went to work.
If you want to create a similar runner, here are my notes. Again, I used scraps, so I didn’t define any fabric requirements. I suggest you do the same. It’ll feel good by the end – a beautiful finish and a dent in the fabric stash to boot! 😉
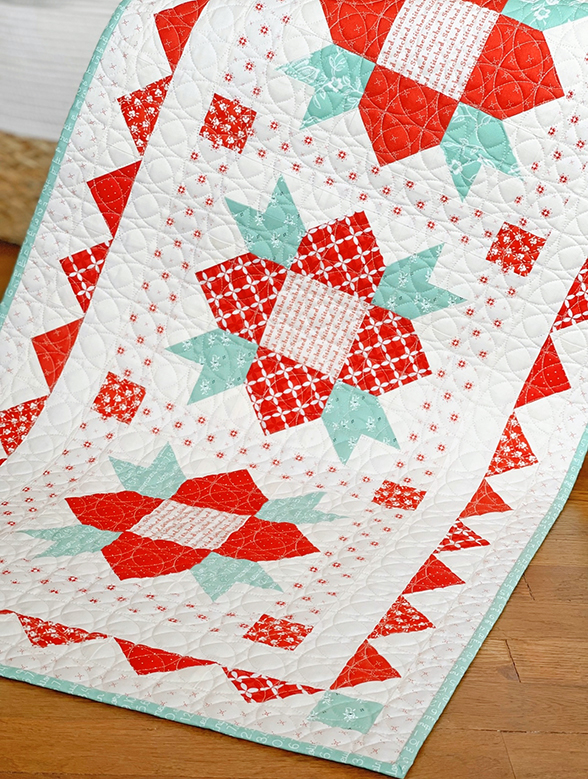
Size: 20.5” x 41.5”
Quilted by Maggi Honeyman
CUTTING INSTRUCTIONS:
Blocks: (3) 9” x 9” finished ‘Invigorate’ blocks
For Block Sashing [low volume print]: Cut (10) 2” x 9 ½”.
For Block Posts [red floral print]: Cut (8) 2” squares.
For Inner Border [ivory solid]:
- Cut (2) 2” x 33.5” T/B borders.
- Cut (2) 2” x 15.5” L/R borders.
For Flying Geese Border [red scraps/ivory solid background/aqua]:
- From red: Cut (34) 2” x 3.5”.
- From ivory solid: Cut (68) 2” squares.
- From aqua: Cut (4) 2” squares.
For Outer Border [low volume print]:
- Cut (2) 1.5” x 39.5” T/B borders.
- Cut (2) 1.5” x 20.5” L/R borders.
For binding [aqua print]: Cut (4) 2 ¼” strips.
ASSEMBLY INSTRUCTIONS:
For Block Sashing:
- Join ‘Invigorate’ blocks together into a row, alternating with block sashing (be sure you have a sashing on the beginning and end of the block row).
- Press toward the sashing.
- Then, join the remaining posts and sashing strips together into (2) rows; alternate a post to a sashing strip (each row will include 4 posts and 3 sashing strips).
- Add these to the top and bottom of the block row.
For Inner Border:
- Add T/B borders first; then L/R borders.
For Flying Geese Border:
- Use the red rectangles and ivory solid squares to create (34) total 1.5” x “3” finished flying geese units using the ‘Sew & Flip’ method.
- The T/B borders will each use 12 flying geese units; the L/R borders will each use 5.
- The aqua squares will be your cornerstones.
- Add the cornerstones to each end of the L/R borders.
- Sew the T/B borders on first; followed by the L/R borders.
For Outer Border:
- Add T/B borders first; then L/R borders.
Quilt as desired and bind to finish!

Thanks so much for visiting with us for our SEWCIALITES day!!
Happy Quilting, Joanna and Susan and Lacey too.
If you would like to see more of Susan’s work on Instagram, CLICK HERE and Lacey’s work, CLICK HERE. To go to my INSTAGRAM, CLICK HERE.
Sewcialites 2 Block 19- Invigorate Block by Joanna Figueroa - The Jolly Jabber Quilting Blog | 10th Mar 23
[…] week’s designer is Joanna Figueroa of Fig Tree & Co. (@figtreeandco), who sewed the 6″ version of her Invigorate block. This intermediate block is […]
Sewcialites 2 Block 19- Invigorate Block by Joanna Figueroa - Project DIY Hub | 10th Mar 23
[…] week’s designer is Joanna Figueroa of Fig Tree & Co. (@figtreeandco), who sewed the 6″ model of her Invigorate block. This intermediate block is a […]
Sewcialites 2 Block 19- Invigorate Block by Joanna Figueroa - Craftersoutlet | 10th Mar 23
[…] week’s designer is Joanna Figueroa of Fig Tree & Co. (@figtreeandco), who sewed the 6″ model of her Invigorate block. This intermediate block is a […]
Spring Has Spru… Nevermind. – Lisa Bongean's Web Blog | 10th Mar 23
[…] by clicking the button above. You can also visit Joanna’s blog “Fresh Figs“ by clicking HERE. She not only gives her two cents on the block, but also offers two […]
Linda Sumler | 10th Mar 23
Thanks , for giving me theses ideas can’t wait to make them.
Kristi Castanette | 10th Mar 23
Thank you for the extra three pattern. These will keep me busy for awhile! They’re all beautiful!