
MODA BLOCKHEADS 5: Week 3
This week’s designer is Brigitte Heitland of Zen Chic and her block is called STELLAR ELEGANCE…and *ELEGANT* it is! Be sure to check out her BLOG, where I’m certain she will have all the details and tips on her Foundation Paper Pieced block.
Since paper piecing is not in the cards for us this week, we opted to create an alternate block…WOVEN STAR! Read on for all the cutting and piecing instructions for both a 6″ and 12″ finished block!

ALTERNATE BLOCK #3: WOVEN STAR
Choosing Fabrics:
- (1) red print
- (2) green prints with enough variation in tone or amount of white in the prints [which makes them feel different]
- (1) low volume cream print
- (1) ivory solid
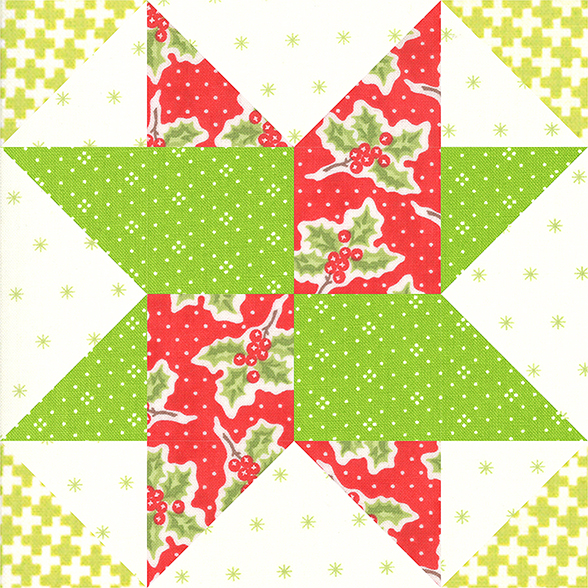
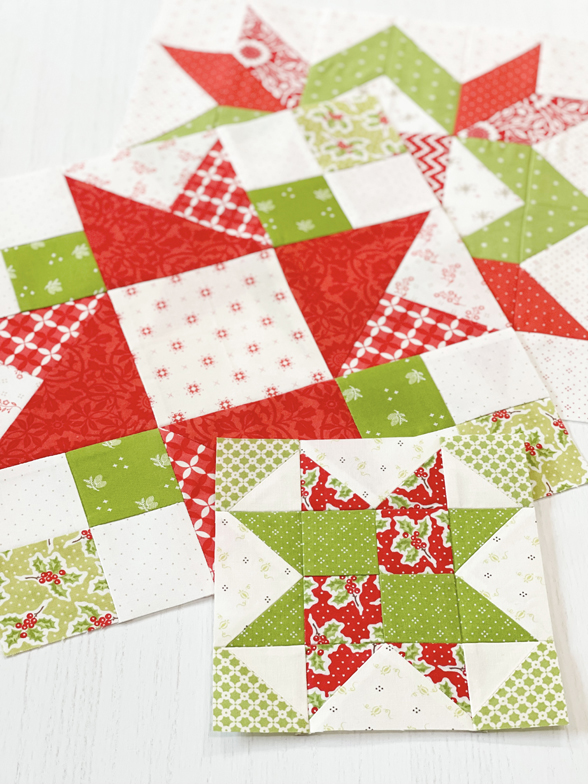
We created our block in the 6″ finished size for this week.
Be sure to keep block size in mind while picking your fabrics to avoid choosing large-scale prints that may get lost in the final block.
6″ Cutting Instructions:
- Red Print [red holly]: (6) 2″ squares.
- Green Print #1 [green eyelet]: (6) 2″ squares.
- Green Print #2 [green lattice]: (2) 2 1/2″ squares cut in 1/2 on the diagonal to yield 4 triangles.
- Low Volume Cream [cream pumpkin dot]: (4) 2″ x 3 1/2″ rectangles.
- Ivory Solid: (2) 2 1/2″ squares cut in 1/2 on the diagonal to yield 4 triangles.
12″ Cutting Instructions:
- Red Print [red holly]: (6) 3 1/2″ squares.
- Green Print #1 [green eyelet]: (6) 3 1/2″ squares.
- Green Print #2 [green lattice]: (2) 4″ squares cut in 1/2 on the diagonal to yield 4 triangles.
- Low Volume Cream [cream pumpkin dot]: (4) 3 1/2″ x 6 1/2″ rectangles.
- Ivory Solid: (2) 4″ squares cut in 1/2 on the diagonal to yield 4 triangles.
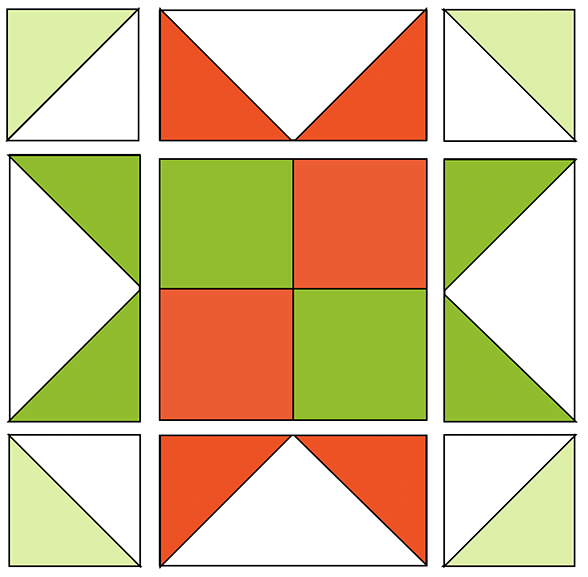
Piecing Instructions:
- Use (2) red print squares and (2) green print #1 squares to create a 4-patch for the block center.
- Using the (4) low volume cream print rectangles and the remaining (4 each) red print and green print #1 squares and the SEW & FLIP method, create 4 flying geese units [2 in red, 2 in green #1].
- Using the (4) triangles from green print #2 and ivory solid, make 4 half square triangle units. Press open and trim to 2″ square [for 6″ block] OR 3 1/2″ square [for 12″ block].
- Assemble the block into 9 units, then in 3 rows. Follow the graphic above.
Fabric Collections:
- Red holly: Christmas Figs II
- Green eyelet: Eyelet Basics [arriving this November!]
- Green lattice: Christmas Figs
- Cream pumpkin dot: Pumpkins & Blossoms
- Ivory Solid
OUR BLOCKHEADS SETTING
We gave a glimpse into our plans for our Moda Blockheads 5 quilt setting in our WEEK 2 BLOG POST, but we’ve decided to expand on it here a tad more for you planners out there!
If you’d like to follow our layout, you will want to keep a few things in mind going forward. You will need:
- (9) 12″ finished blocks for the quilt center
- HINT: choose the more complex blocks to finish in the large size.
- (20) 6″ finished blocks for the L/R, T/B pieced borders
- (4) 9″ finished blocks for the cornerstones
- Don’t get confused here! The Moda Blockheads 5 series is set up in 6″ and 12″ blocks only. We will find a suitable block and offer alternate instructions to create one in the 9″ size! We will make the block 4 times to keep some uniformity to the quilt top.
You will notice that if you add these up, you will get a total of 30 blocks. The Moda Blockheads this year is set to include 40 blocks total. 10 blocks in the first grouping (September-November 2023), and 30 blocks in the second group, which begins January 2024 and runs through July 2024. That means that there will be an excess of 10 blocks. We may still create these blocks and use them in other creative ways OR it may work as a great buffer if there’s a specific block that doesn’t “fit” our Christmas theme -or- if scheduling conflicts with my sewing time! Either way, we will certainly keep you apprised of our plans each week right here on the blog.
And to complete the look of our quilt, we will do lots of scrappy sashings and cornerstones…a perfect Fig Tree finish!
MODA QUICK LINKS
For ALL the details and specifics on Moda Blockheads 5, I encourage you to visit these useful resources:
MODA BLOCKHEADS 5 FAQs AND FABRIC RECOMMENDATIONS
INTRO TO MODA BLOCKHEADS 5 LIVE VIDEO [REPLAY]
BLOCKHEADS LIVESTREAM RECAP BLOG POST
MODA BLOCKHEADS FACEBOOK GROUP
And last, but certainly not least, the MODA BLOCKHEADS 5 BASIC PAGE – this is where ALL the block patterns will be saved for easy reference as we move forward!
Happy sewing! See you back here next week!
-Joanna
Kim Harper | 27th Sep 23
Thank you for making this alternative block!!
Donna G PHILLIPS | 27th Sep 23
is there a way to print this block
Nancy Gail | 28th Sep 23
This is the third week of BH5 and each week I have used your hints or pattern! Thank you! Also, I have been doing the 12″ only and see your setting calls for a mix of 6 and 12″ blocks. Will the final size be somewhere in the 60″x78″ range? If so, I’ll start on those 6 inchers. Thanks again
joanna@figtreequilts.com | 28th Sep 23
So glad to hear the hints and blocks are helpful! As for the final size… that is a great question! It is only going to be 66″ x 66″ or a bit bigger if you want to add a larger border but it will be a square.
Deb Forfia | 28th Sep 23
In the middle picture, the center doesn’t look like a fourpatch. How did you do that block?
joanna@figtreequilts.com | 28th Sep 23
In fact it is a four patch. Look at the diagram to see how the fabrics make the shape 🙂
Brenda | 1st Oct 23
Looking for away to print out just the pattern. Anyone know the answer?
joanna@figtreequilts.com | 23rd Oct 23
We don’t have instructions on a separate PDF, just here on the blog. 🙂