
GIFT WEEK 2023: ORNAMENTS
Welcome back quilty friends. Our 4th and final GIFT WEEK 2023 post is here! I hope you’re inspired by Susan’s guest blog posts over the last 2 weeks. I know I sure am! Every year I save all kinds of ornament ideas and then I usually run out of time to make many of them. But this year I am totally inspired, aren’t you?
In addition to today’s ornaments… we are having a special ORNAMENT YOUTUBE TUTORIAL on Saturday so come on back on Saturday morning to see me live and in person doing some Christmas ornament making! n. Joanna
If you haven’t had a chance to view our previous GIFT WEEK posts, I highly suggest taking a look… there are a lot of great ideas in there for you to take a look at.
FROM SUSAN
Welcome back to our final day of Gift Week! I have had the best time sharing with you some of the things I have made for gifts for friends this year.
I admit, I think this is my favorite gift ever for a Gift Week Project. We have some friends that moved out of their home of 40 years to a retirement community. Even though they are nonagenarians, they are still a spry couple enjoying life fully with their friends and family. They are givers in the community and attend all their grandchildren and great grandchildren’s events and celebrations. They lead by their example of friendship and love to each other, as well as our community at large. I am so glad they are in my daughter’s life as role models and friends.
A few weeks ago, I overheard them talking about how they were loving their new house. The complex they moved into has all kinds of clubs and activities, and they were looking forward to water aerobics and cooking classes. They did casually mention that they were a little sad with the holidays approaching that they weren’t going to be having a Christmas Tree. There simply wasn’t room to store all the accessories and decorations in their new apartment, but they were excited about picking up poinsettias and taking their puppy to visit “Santa” at the community center and forming new traditions.
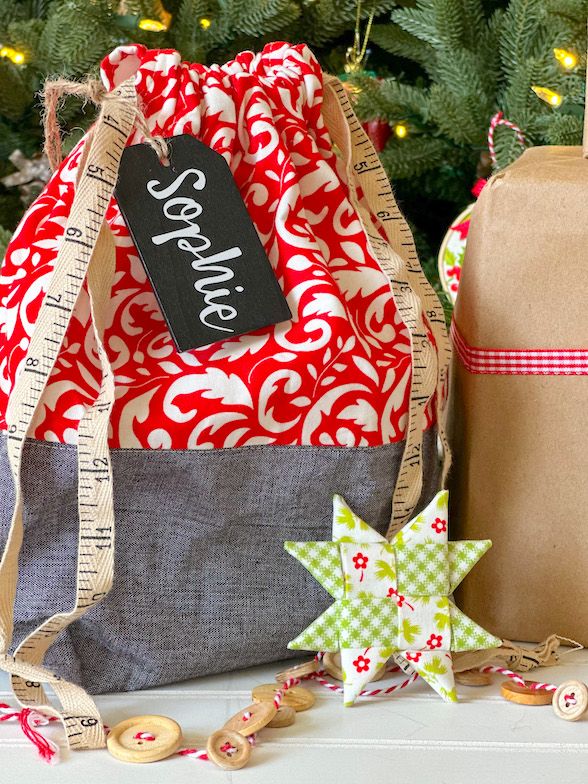
I got to thinking, what if we surprised them with a small tree, and a box of ornaments?! Our family would drop it off right after Thanksgiving and come back at Epiphany and pick it up! I’d keep the tree and ornaments at my house and then next Thanksgiving drop it off again. This way they could still enjoy having a tree and sipping their coffee by it, but wouldn’t have to store it throughout the year.
I found the nicest set of two small trees at Target during their Pre-Black Friday deals and picked them up. They were just the right size and self-contained in a “pot” so they wouldn’t take up as much space and become a tripping hazard.
My daughter and her two of her friends gathered at our house and we had an afternoon of crafting making ornaments and decorations to trim the tree. They really got into helping me prepare ornaments and before we knew it, we had enough ornaments to decorate a whole second tree as well! We haven’t found a second family to surprise, but all three girls are on the lookout!
Sophie and I dropped off our “Tree in a Box” to our friends and they LOVED it! Not only did we have a lovely visit with hot cocoa and shortbread cookies while we dropped it off, they commented on how much fun they had decorating the tree and how the visit with our family was even better! We have a date set for a visit in the New Year to pick up the tree and hear all about their holidays!
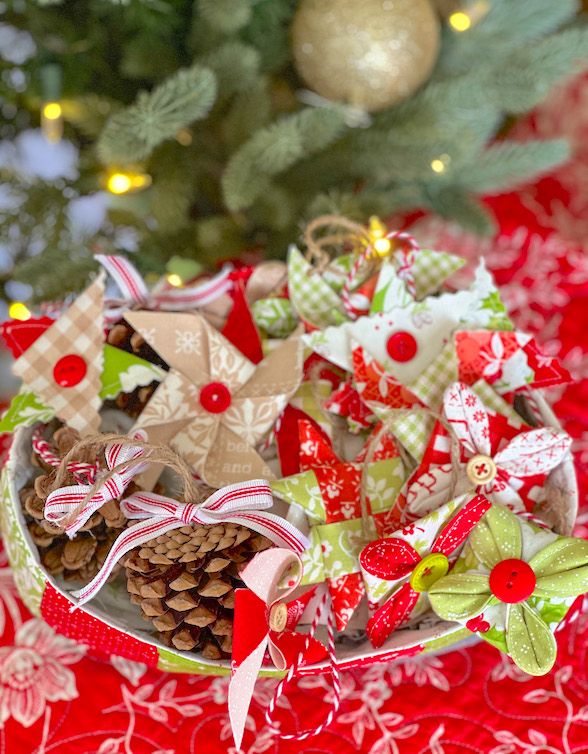
We used many different online tutorials for our ornaments and garland. Pinterest is very helpful for narrowing down your ideas and keeping a list of ornaments you might be interested in making (You can find Fig Tree on Pinterest HERE). Many of the ornaments are “no-sew” and would be great to make with your children or grandchildren. We often use ornaments as package decorations, and I made a few extras to keep on hand for such occasions.
……
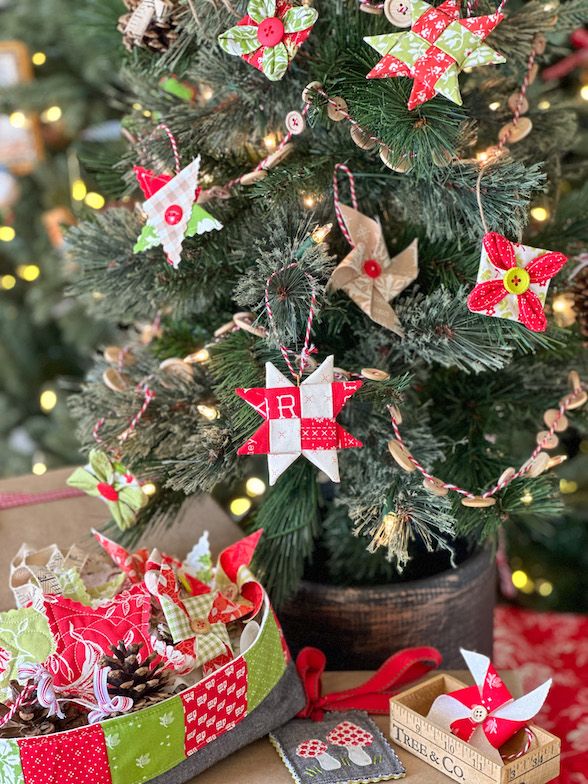
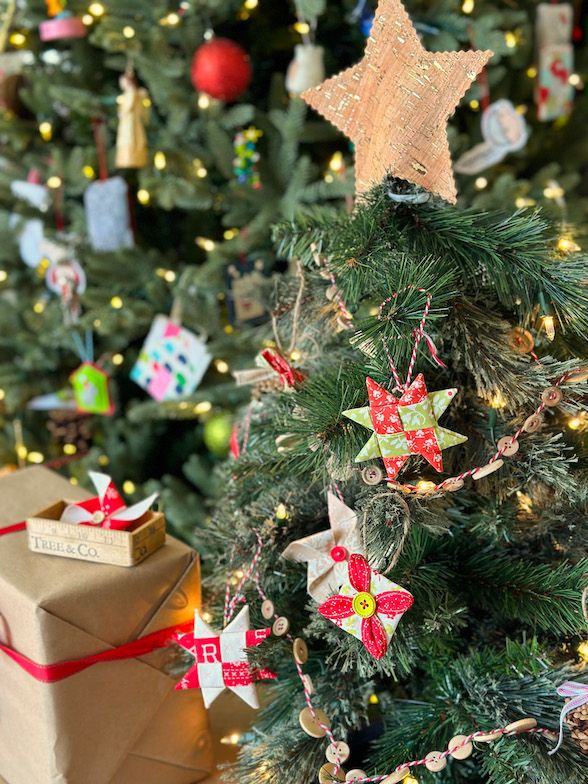
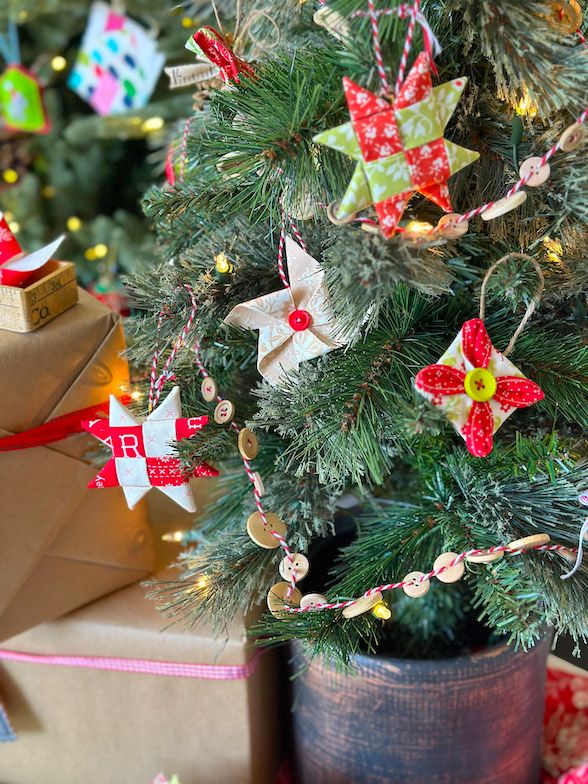
Woven Star Ornament:
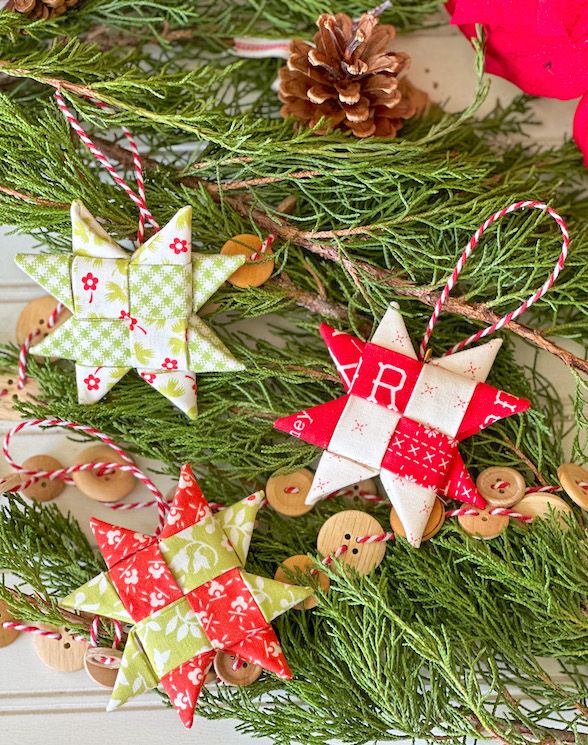
There are many different tutorials for these Woven Stars including this one by Moda Fabrics. We opted to make our initial strips a bit skinner since we wanted our stars to be in proportion to our tree, so we cut our initial strips at 3” x 11.5” and found it helpful to give our fabric strips a light spray of starch to help them remain crisp while folding.
The girls really enjoyed making these no-sew ornaments and loved picking out fabric combinations.
……
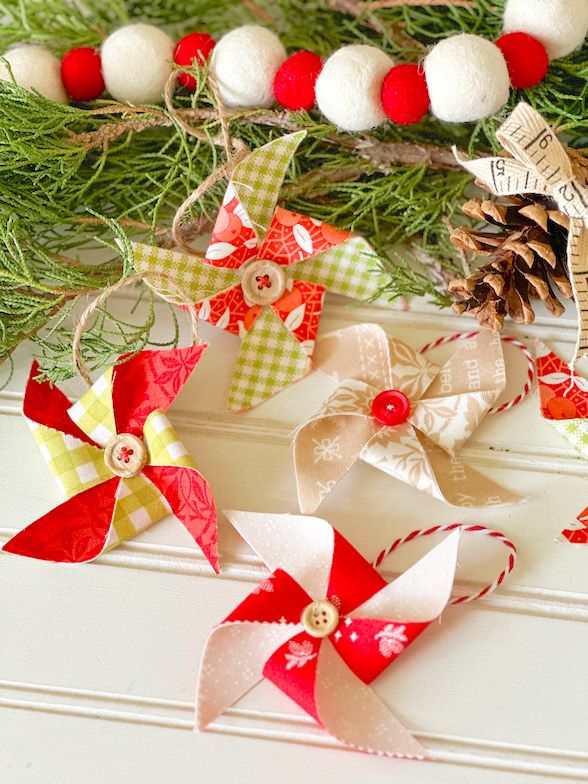
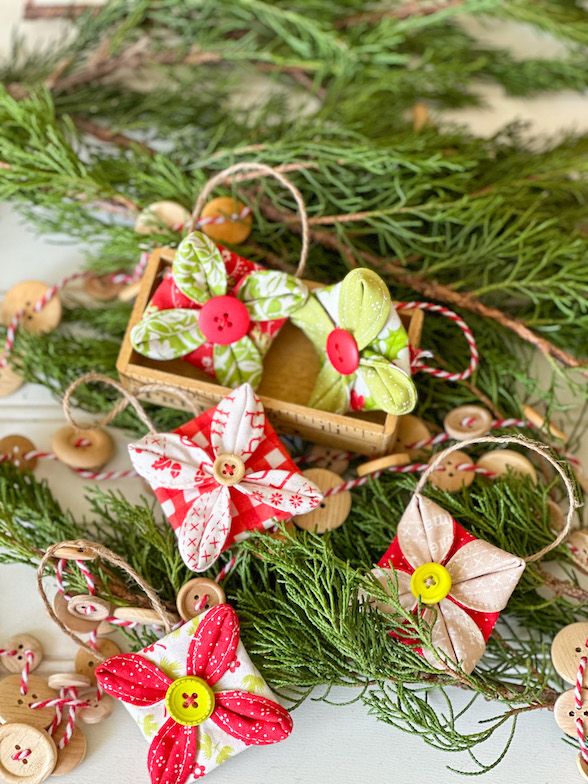
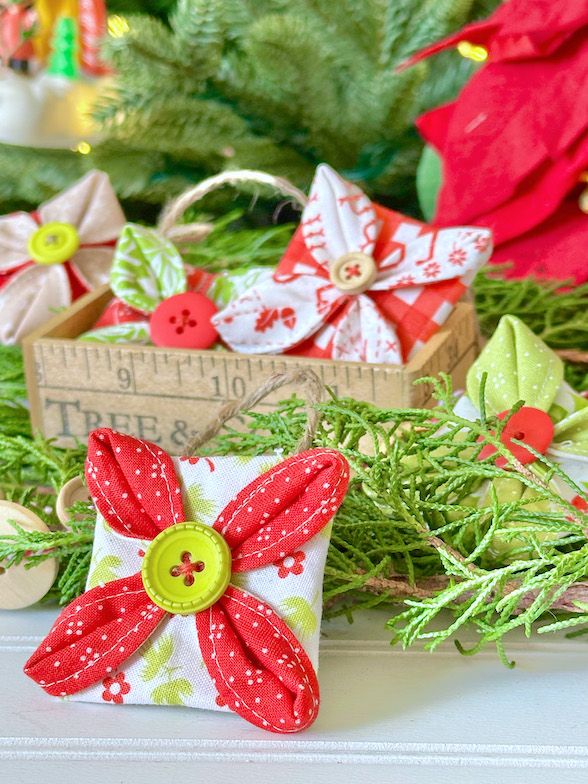
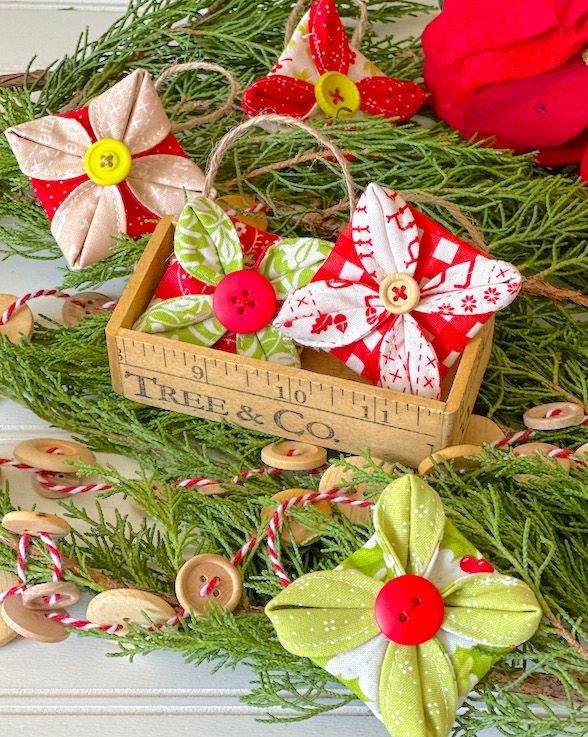
Pinwheel Ornament:
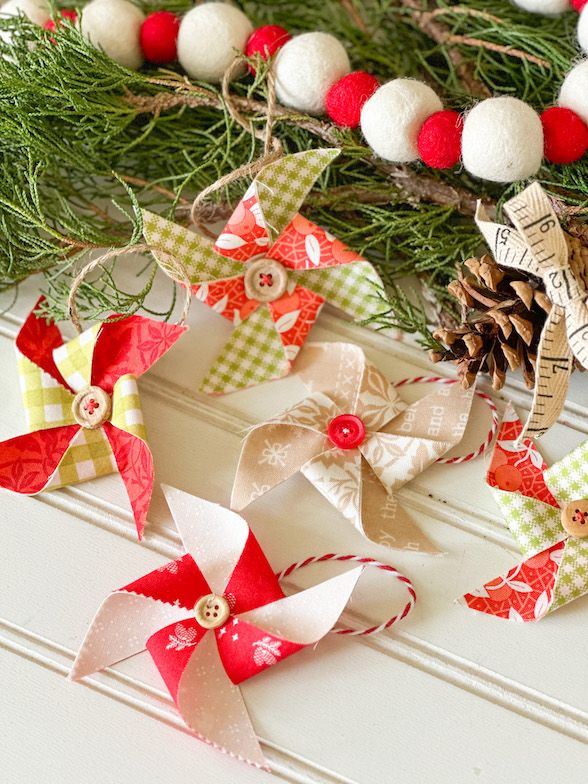
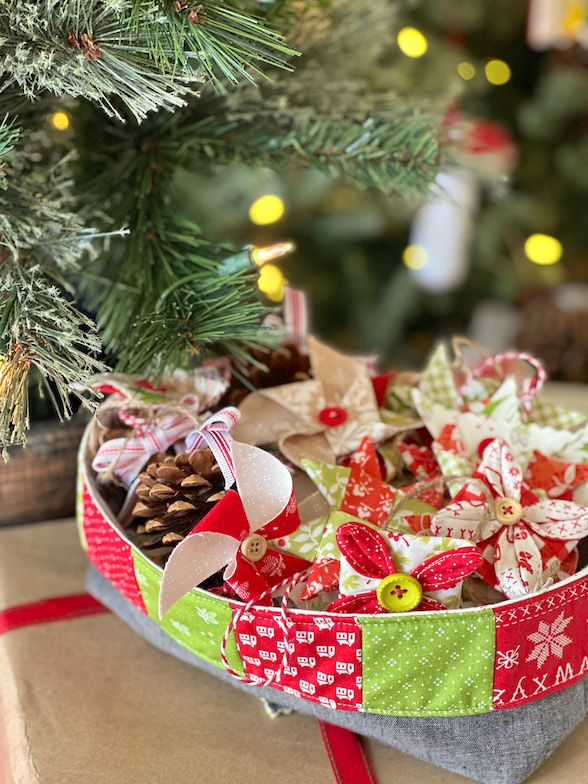
There are several full tutorials for this ornament online with full pictures and videos, but we started with (2) 3” complementary squares of fabric. We fused them together with a lightweight fusible product and cut in from each corner on the diagonal to almost the midpoint. Then we folded in the corners and used a button to keep the corners folded in place.
These were a favorite ornament to make since they came together very quickly, and the sewing was minimal. For a no-sew project, hot glue the button into place.
……
Fabric Origami Ornament:
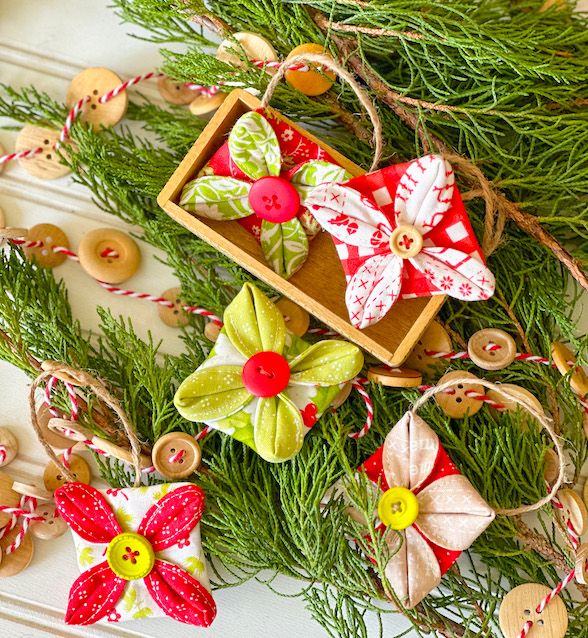
These folded ornaments were the trickiest ornaments we made and took the longest time to perfect the technique. There are many tutorials and videos we found online, but when we made them, they were too large for our small tree. We experimented with sizes and were most happy with the results when we cut the initial circles to just smaller than 5” so they could be cut from a charm pack.
Although these ornaments are very cute, I would not recommend making them with small children. My daughter and her friends each made one of these, and after that they had had enough. 😉
……
Three-Fabric Star Ornament:
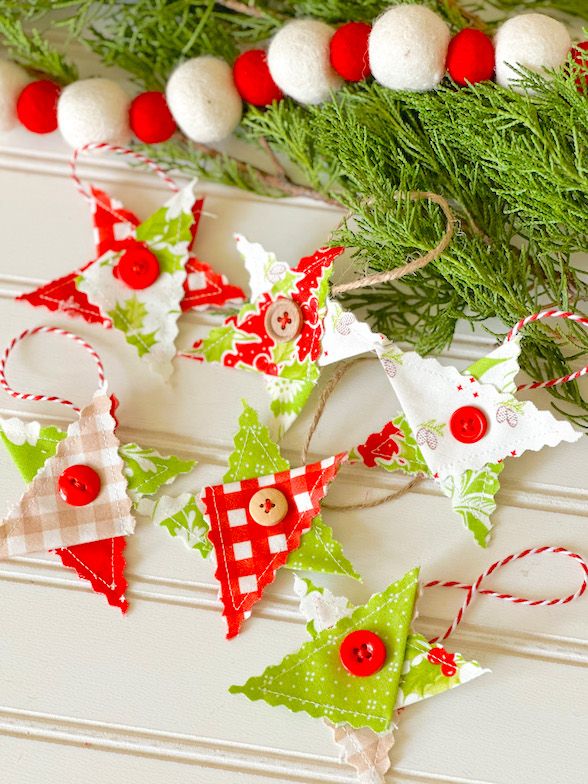
These ornaments are also a popular tutorial online and are made by using (3) different squares of fabric. We opted to cut our initial squares at 3” and we opted for a sewing version since the girls wanted some sewing machine practice time. These ornaments were a big hit and with a little help, I think kids of all ages would enjoy making them.

……
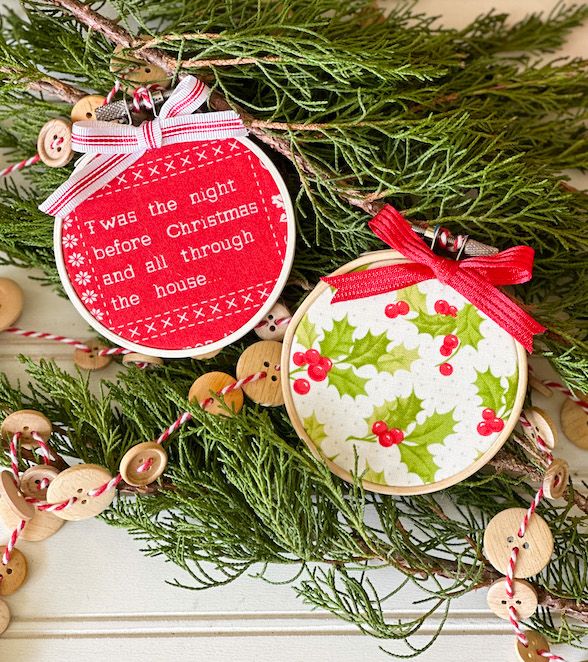
Fabric Hoop Ornament:
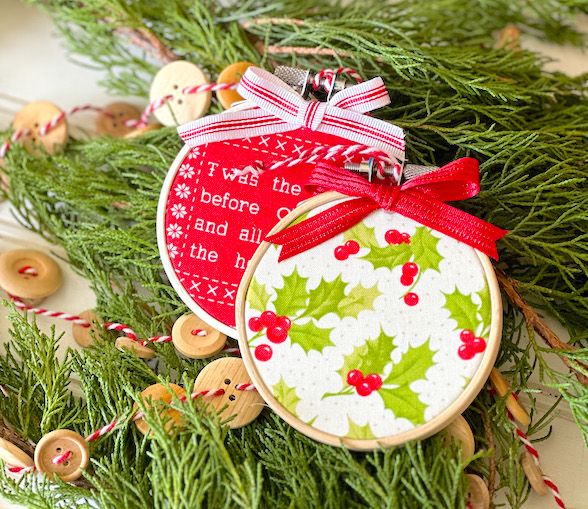
It doesn’t get much simpler than this! Use a 5” square of fabric and fuse it to some fusible batting. Then “hoop” the fabric with a 3” wooden embroidery hoop. (For added cuteness paint the hoop with craft paint). Once tight, hot glue the fabric to the back to make the ornament clean and tidy. Finish off with a bow and hanging loop. The girls loved making these and if I had had more hoops, I think they would have made a dozen more!
……
Quilted Star or Faux Flying Geese Ornament:

When I have an extra bit of backing fabric on my long arm, I like to make some pre-quilted panels that I can then use for other projects. I had some scraps of red and green fabric, and I traced a star cookie cutter with a Frixion pen and loosely cut around it. I sewed on the line on my sewing machine and trimmed up the edges with pinking shears. I tacked on a loop for hanging.
I also made some of these Faux Flying Geese Ornaments much the same way. Instead of tracing a star, I cut out a rectangle and two triangle shapes and appliqued the triangles on top of the square. These turned out so cute, and I quilted up some additional fabric to make some more!
……
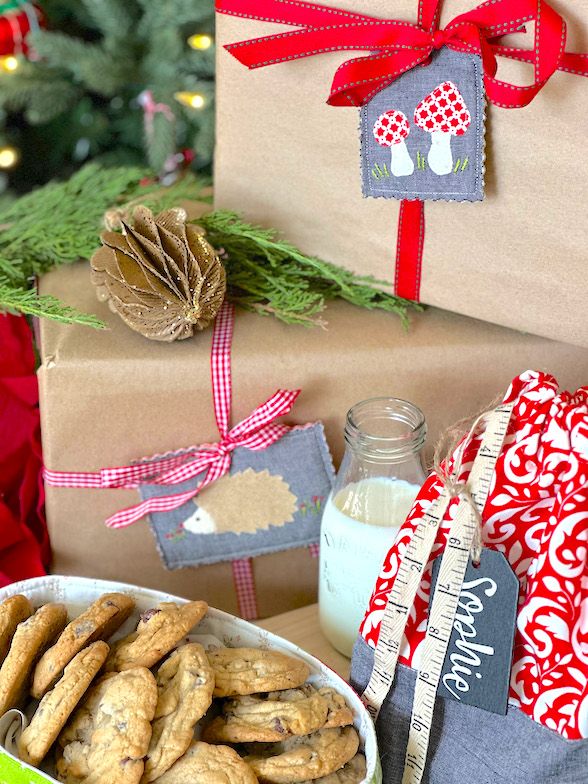
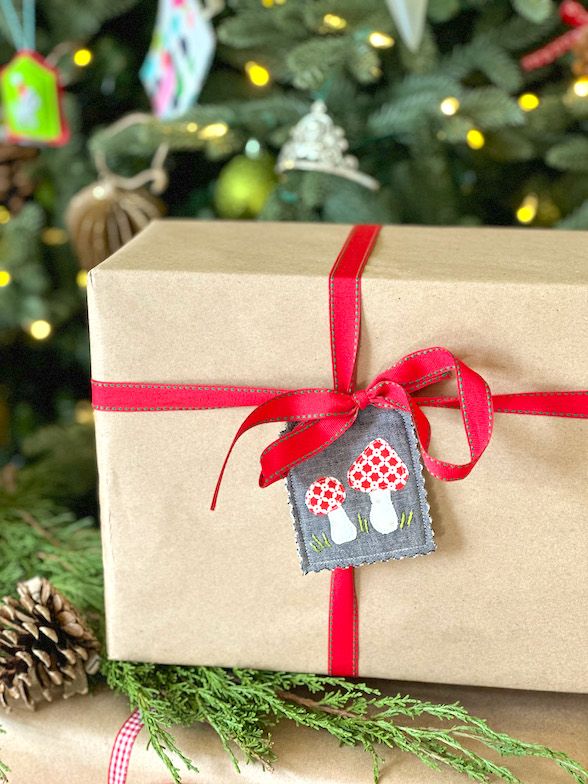
Mushroom and Hedgehog Ornaments:
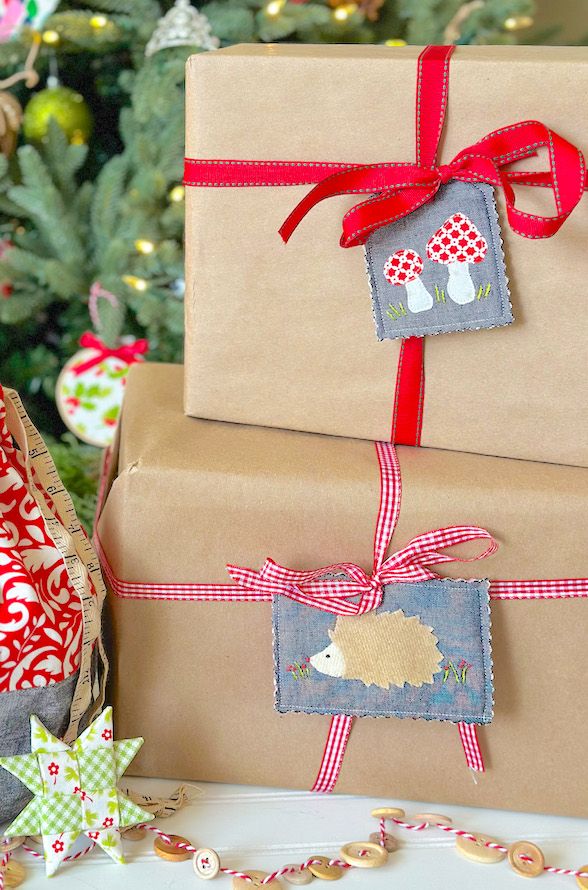
I showed these ornaments a few years ago for, I think, our first gift week and I think every year since then we have made more of these ornaments and gift tags. I size the hedgehog and mushroom pattern from the HAZEL THE HEDGEHOG Pattern to 50% and use either cotton or wool for my applique. I stitch a rectangle around each applique and trim with pinking shears and add a hanging tag.
……
Button Garland:
The girls really got into stringing these button garlands! We used a large package of wooden buttons we got at our local craft store and threaded bakers’ twine through them. The girls used an upholstery needle to help guide the string through the buttons and varied the size and color of the buttons for a random pattern. We made our garlands approximately 36” long.
……
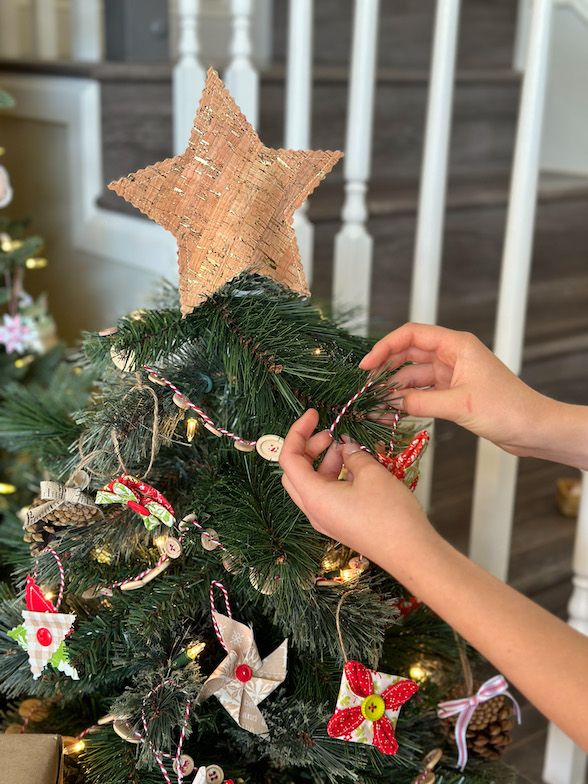
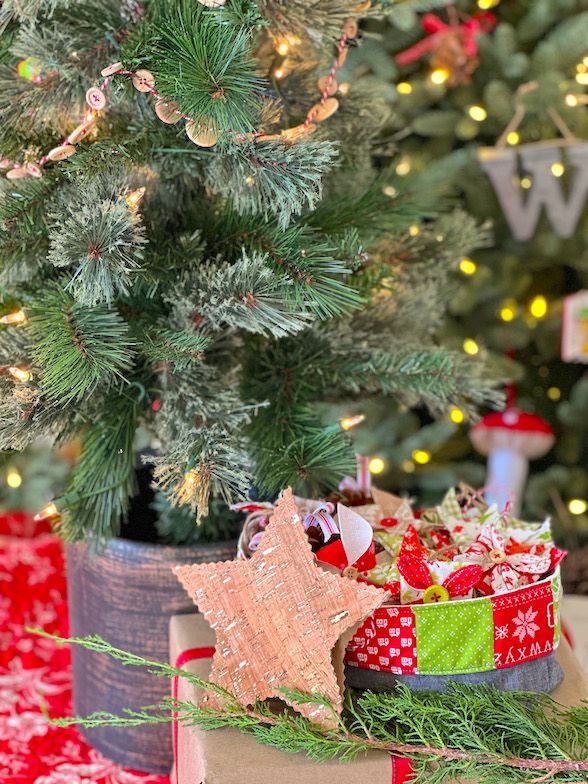
Cork Star:
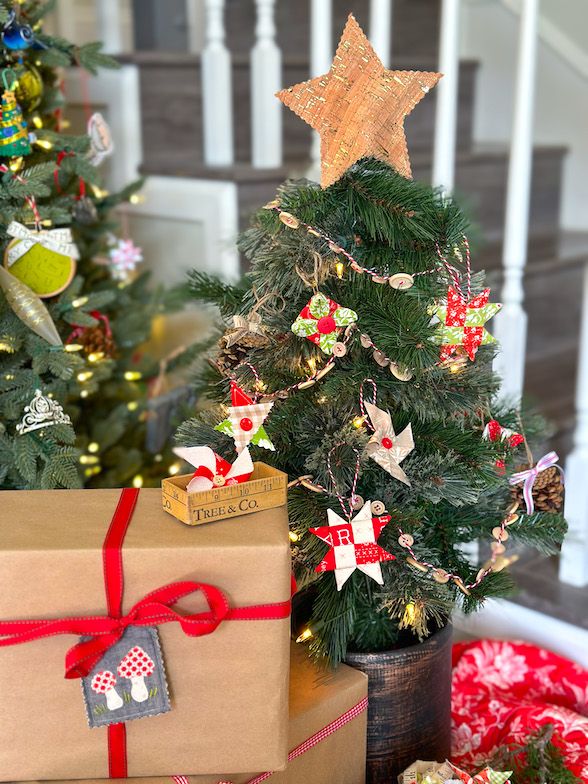
No Christmas tree is complete without a topper! The girls came up with the idea of sewing a star and leaving the bottom unsewn to slip the top of the tree in. We made ours out of foiled cork and it was the perfect addition to the tree.
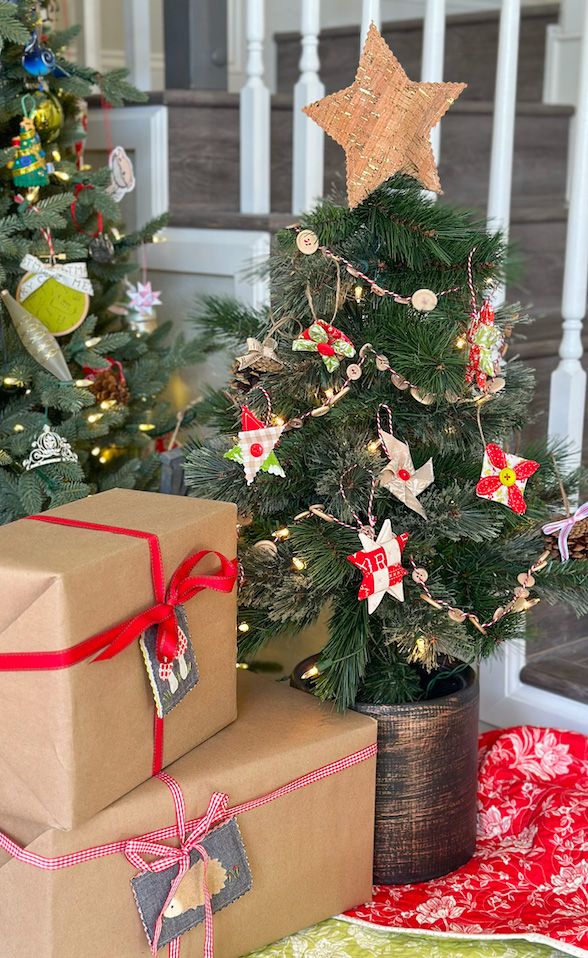
We packaged all the ornaments in a few of the LITTLE BOXY CATCH-ALL BASKETS and tucked them into a plastic storage bin for easy transport and storage.
……
Thank you all for coming along with me these past two weeks as I shared some of the gifts I made for the special people in my life! I have such a great time creating and finding new ways to use Joanna’s patterns. Leave us a message if you decide to try any of these projects!
-Susan
Marcy Henri | 7th Dec 23
Adorable ornaments! I saw all the hoop ornaments everyone was sharing at Market & I ordered the 3″ size. And, then I found some that are about an inch in diameter! Hopefully they will arrive in time to make for my granddaughters’ mini Christmas tree.
I can’t wait to see what all you ladies have in store for Saturday!
Victoria Webb | 7th Dec 23
What a lovely idea! My dad just moved into a skilled nursing facility following a stroke. I am going to have his great grandsons help me make a collection of these ornaments to decorate a small tree for him.
joanna@figtreequilts.com | 17th Dec 23
So sweet!
Karen | 8th Dec 23
Love this ornaments and the tree giving. This is truly the Christmas spirit at its best!
joanna@figtreequilts.com | 17th Dec 23
We so agree!
shirley pearce | 8th Dec 23
Love these rnaments because they are different than the ones we normal get to make! I going to share the ornaments on our tree out front to inspire love during this coming season.
joanna@figtreequilts.com | 17th Dec 23
Fabulous!
Carolyn | 8th Dec 23
Love all the great ideas! Thanks for letting us know how difficult they were for all of us watching the clock tick way too quickly! I think I have time to make a couple of the easier ones!
joanna@figtreequilts.com | 9th Dec 23
yes, its always nice to know how to make something more simple!
joanna@figtreequilts.com | 17th Dec 23
Susan is so good like that! 😉
Deb | 10th Dec 23
Thank you so much for taking the time to share your beautiful ornaments. It has been so much fun making so many things from your blog post this holiday season.
joanna@figtreequilts.com | 17th Dec 23
Thanks, Deb. Homemade is the best!
Lisa B | 10th Dec 23
Love the ornament ideas. I would like to start with Woven Stars. Maybe I’ll make a few around the 25th of each month and will have a tree full by 12/25!
joanna@figtreequilts.com | 17th Dec 23
Oh thats a fabulous idea!!!
Janequiltsslowly | 11th Dec 23
What a lovely gift idea! I will be on the lookout for someone to give a little tree to this year. 🫶🏼
joanna@figtreequilts.com | 17th Dec 23
Awesome! <3