
PINCUSHION TIME
Well you might say I have an obsession with pincushions. Before you ask… NO, I do not use all of them. YES, I love them and will never stop making them. YES, many of them do get used but many are used in bowls as “bowl fillers” and little decorations in my studio. NO, there is no such thing as too many.
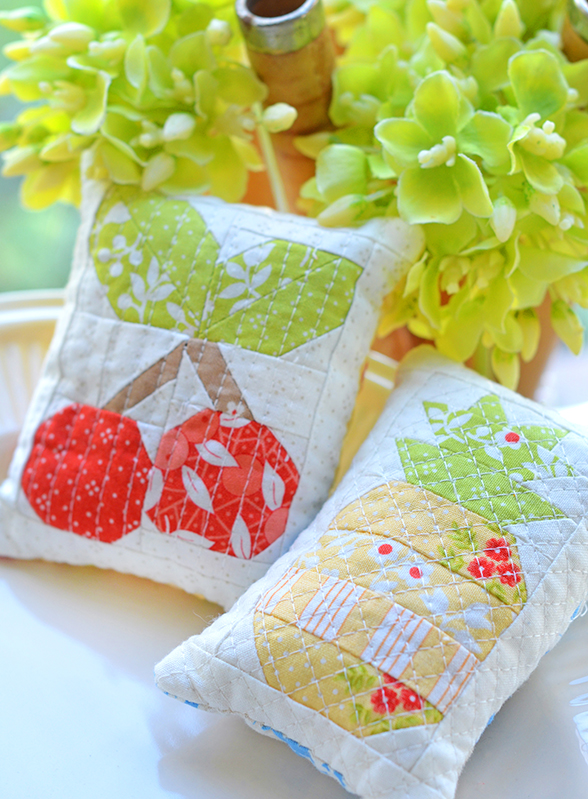
When I started working on the new FRUIT SALAD book, I kept thinking in the back of my head that these fruit blocks would look great in mini sizes. But I knew I didn’t have any brainspace or book space to do that.

• • • • • • • • • • • • •
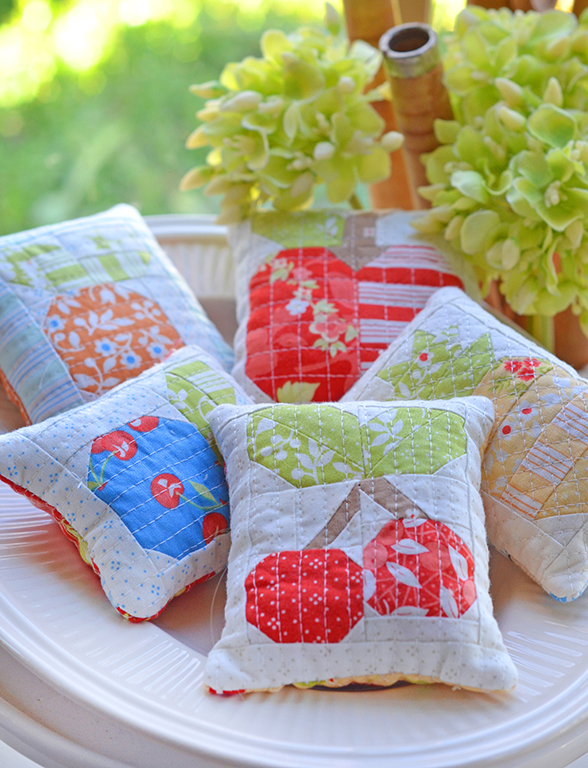
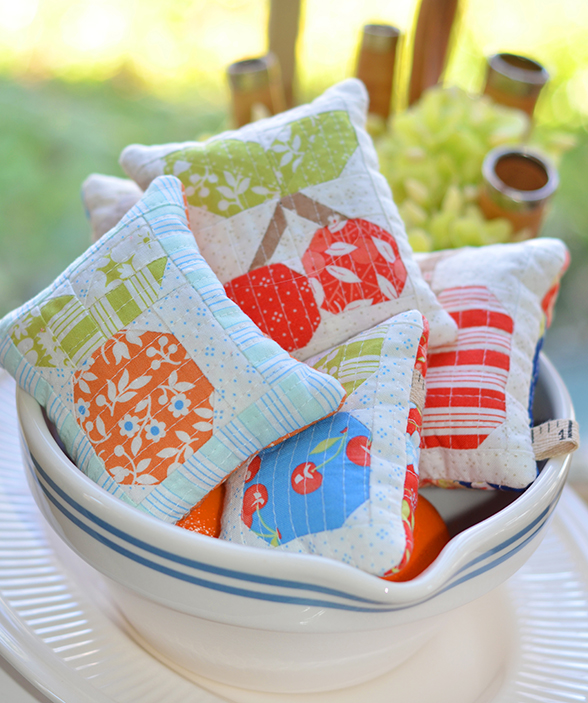
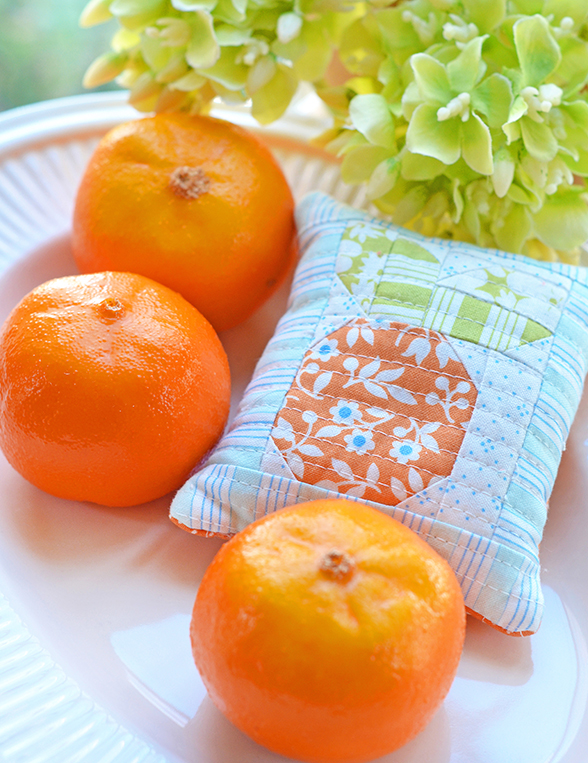
Imagine my surprise when I received a special gift from my dear quilty friend, Susan. We had just gotten together for a lunch date with our husbands when she brought out a bowl of these little wonders!!! Oh my gosh. I love EVERY. SINGLE. ONE OF THEM. SO MUCH.
Check out all of Susan’s notes and directions on how to shrink the blocks down for yourself below…
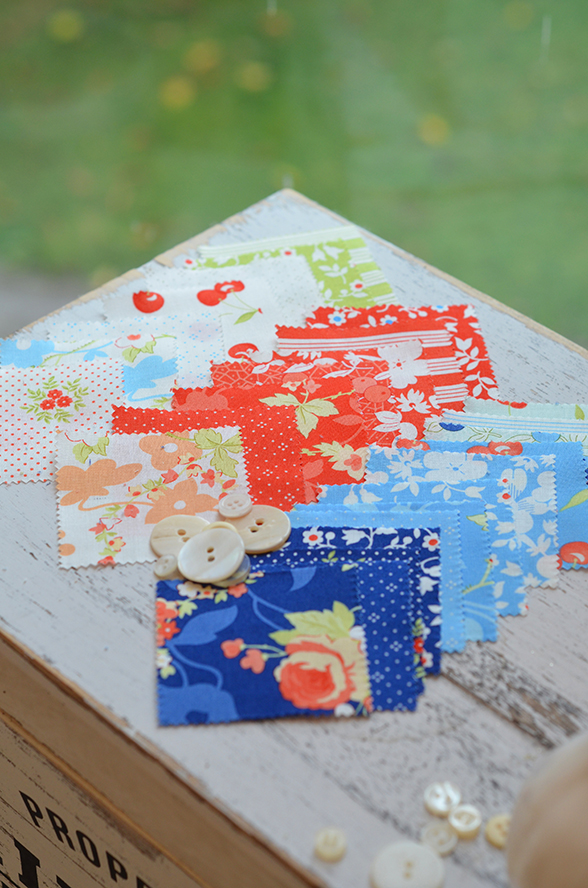
You could work with your fat quarter bundle scraps or with something as small as a mini charm for some of these guys!
FROM SUSAN:
When Joanna showed me the diagrams for the quilts in her Fruit Salad book, one of my first thoughts was “How cute would the blocks would look mini-sized as ‘bowl fillers’ for display on shelves or in a dish on my kitchen table, or as pincushions for my sewing room?” I love decorating with these small items and especially love that they are a quick and easy project I can do in an afternoon of sewing. After I finished making one of the samples included in the Fruit Salad book, I took my scraps and got sewing!
There are no specific directions in Fruit Salad for the pincushions and bowl fillers, but I didn’t let that stop me. If you would like to make some too, we are here to get you started. All you need is your Fruit Salad book, some fabric/batting scraps, paper and pencil, and a little bit of quilty math!
We as quilters use math all the time with our projects! We add and subtract seam allowances, and we know the standard formulas for making particular blocks like Half Square Triangles and Flying Geese. We use basic principles of geometry as we assemble our blocks and do it without thinking! Somewhere along the line, quilt math got a bad reputation, but I can assure you it is not that scary!
HOW TO BEGIN
I made all of the pincushions/bowl fillers at 50% of the size written in the book. That means that if the block finished 6” x 9” finished, my tiny block measured 3” x 4 ½” finished.
Resizing blocks like I did to make them half size isn’t hard, it is just another form of the same “Quilt Math” you do on a daily basis. It might take a bit of time the first few times you do it, but you will be a pro in no time.
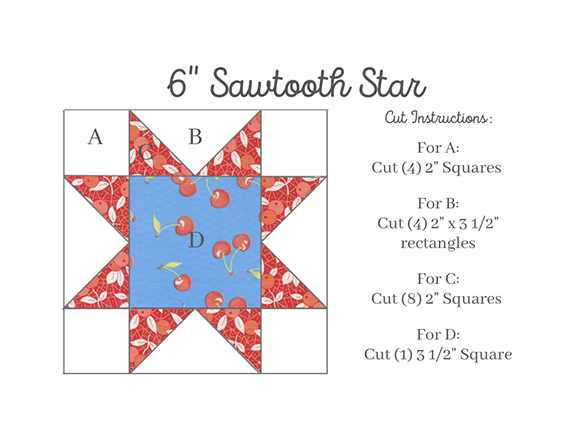
I’ll show you how to resize a block with a 6” Sawtooth Star Block, and you can use the same principles to reduce the size of any of the fruits in Fruit Salad.
HOW TO HALFSIZE A BLOCK
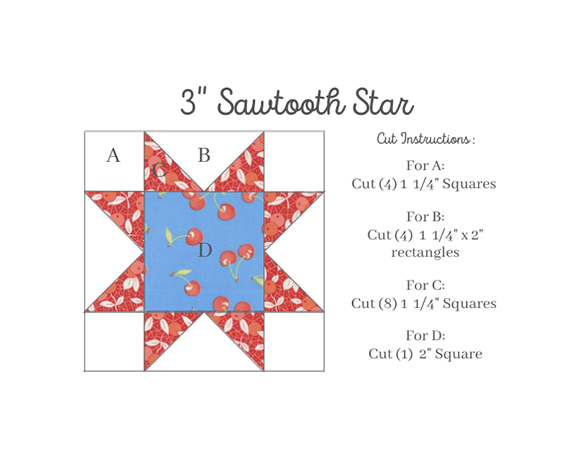
In this 6” finished Sawtooth Star block, we are given the sizes that we need to cut. To make the block a 3” finished size, we need to apply one simple formula to each individual piece we cut.
Before you say that formulas scare you, let’s look at the Sawtooth Block for our example.
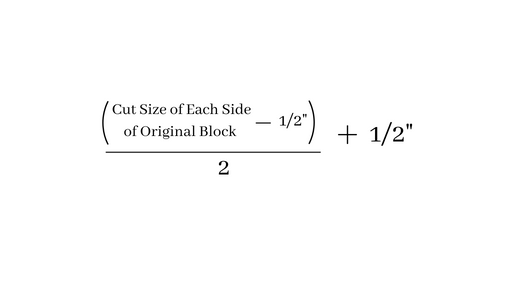
Piece “A” we know from our chart is cut as a 2” square. So, we start with 2” and subtract ½” (for seam allowances) and we get 1 ½”, or the finished size of the piece. We then divide that number by (2) to reduce the piece by 50% and are left with a piece that is ¾” finished. From here we must add back in our seam allowances by adding ½”. We then have a final cut size of 1 ¼” square. For our 3” finished blocks we will need to cut (4) A pieces that are all 1 ¼” square.
• • • • • • • • • • • • • • • • • •
Easy right? You might say that works out well for a square, but how do we do it for a rectangle? Good question! The answer is you do it exactly the same way, but do it for each side of the rectangle. Let’s take piece “B” in our example. We know from our reference chart that piece “B” is cut 2” high x 3 ½” wide. We start off by subtracting ½” for the seam allowances of the width, and are left with 3”. From there we will divide by (2) to reduce the piece by 50%, and are left with 1 ½”. We add back our seam allowances and the final width to cut at will be 2”.
• • • • • • • • • • • • • • • • • •
Then we will follow the same process for the height and will determine that we need to cut each “B” piece 1 ¼” x 2” to fit into our 3” block.
• • • • • • • • • • • • • • • • • •
With each cut piece, we follow the same formula, and continue doing it until we have done the same calculation for every unit in the block.
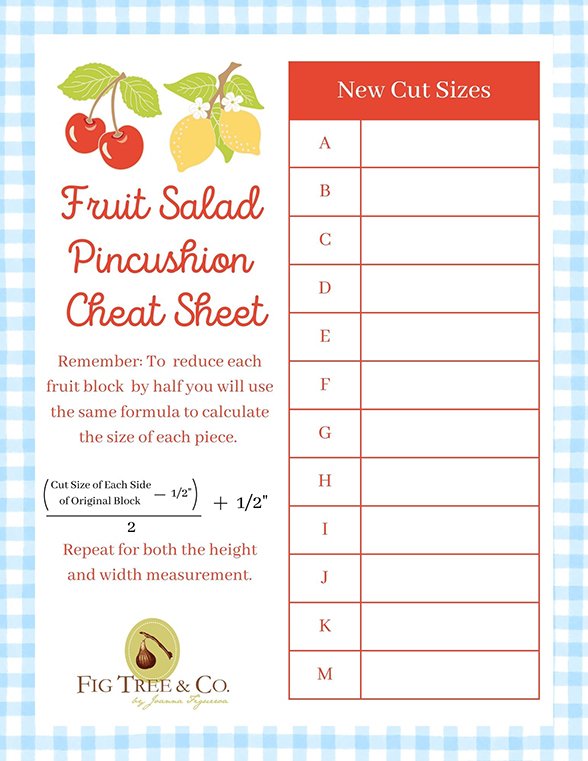
You can use this method with all blocks; it is not just limited to Sawtooth Stars or the Fruit Salad blocks. Be sure to write down on a scrap of paper (or click HERE and download our handy resizing sheet ) all your measurements so you can keep track of all of your dimensions and don’t get confused as you are cutting and sewing. Plus, its handy so that you won’t have to recalculate dimensions in the future!
SPECIAL NOTE
***Occasionally when you are calculating out the sizes of your cut pieces, you will get a number with several decimals that are not part of our standard ¼ or 1/8” pieces. You can either take your block down to cutting 1/16” increments which is most accurate, or you can round to the nearest 1/8” or ¼”. For example, if I did my “Quilt Math” for a 7 3/8” cut square, I would come up with needing to cut a square 3.94. Since that is not a standard size, I would round to the closest mark on my ruler, which in this case is 4”. I would then cut a 4” square. I might have to trim a few of my other units to get the block to come out to the right size but it will just be a sight sliver here or there and usually not noticeable in the final block.
• • • • • • • • • • • • • •
After you have calculated and recorded all of your new cut sizes, you will sew your blocks using the same methods as the blocks are constructed in the FRUIT SALAD book. The only change will be that your new pieces will be smaller!
Stay tuned for Part 2 next week where Joanna and I will give all of our favorite pincushion finishing tips!
Sharon | 8th Mar 23
These are so cute! I will definitely make some. I have multiple pincushions and I do use them. I move them from room to room, work area to work area. But I think my sister needs something with the lemons. Beautiful!
Sue | 8th Mar 23
These pincushions are fabulous!! Thank you so much for your downsizing tips. I’m excited to receive my book and make some bowl fillers.
Stephanie Caulfield | 9th Mar 23
This is going to be on my to-do list. I really enjoy all the little fruits.
Dana M Haskell | 9th Mar 23
These are so cute! My book is due to arrive Saturday and I think these little pin cushions would look so cute in my Jadite batter bowl!!
Sharon Colburn | 9th Mar 23
These are really cute! May have to try making some later.
Tamie zolman | 9th Mar 23
Love these!!!. Looking forward to making them.
Heather | 9th Mar 23
Anything tiny is awesome! These are especially awesome!
Susan | 9th Mar 23
Absolutely adorable! Printing out the cheat sheet now THANK YOU
Danita Turner | 9th Mar 23
So cute! They are cute stacked up in a bowl high enough where the dog can’t use them for toys! Lol
Amy | 9th Mar 23
I always wondered how to do this. Looking forward to trying it.
Debbie C | 9th Mar 23
I love how summery the fabric and designs are!!!
Christine | 9th Mar 23
That chart is super handy! The math nerd in me loves it!
Sandra davies | 9th Mar 23
These pin cushions are simply darling!
Beth Gaugler | 9th Mar 23
I NEED these! On the to do list!
Love this idea!
Carla | 9th Mar 23
These are so cute, will definitely be making a fruit bowl of pincushions!
Jane Bleigh | 9th Mar 23
So cute! I have the perfect bowl to fill with these little darlings . Thanks for the good instructions.
Stacy Lindblom | 9th Mar 23
These are so fabulous!! I definitely need to make a bowl of fruit cushions! ❤️❤️
Jennifer Graff | 9th Mar 23
These are so cute! I may have to make some! 🍒
Tamara Kemp | 9th Mar 23
So adorable! Thank you for the inspiration ❤️
Kim Peterson | 9th Mar 23
These pincushions are so sweet!! Love your new fabric line and most of the other Fig Tree fabric and patterns!!
Karen Sanford | 9th Mar 23
These are the cutest little pincushions and as soon as I saw them I knew I wanted a bowl full of them. Susan, thank you so much for sharing this great formula for resizing. I’m going to give it a try😊 Wish me Luck!!
Debbie J | 9th Mar 23
These are so adorable! Thank you so much for the instructions and the cheat sheet. I look forward to trying some!
Kathy | 9th Mar 23
I can’t wait to get started on these sweet little pincushions! Love them! Thanks Joanna and Susan!
Diane | 9th Mar 23
Theses pin cushions are darling! You’re right, you just can’t have too many!
Lynne Hurley | 9th Mar 23
How adorable! Just what I need, another project I don’t have time for, lol! 😂 The fabrics are so pretty and the bowl of pin cushions is so cheery!
Stacey Hunter | 9th Mar 23
So cute! Thanks, Susan, for the cheat sheet!
Jenny Reese | 9th Mar 23
Hoping to make one of each soon!! Wonderful fa Ric’s and patterns
Maria L Zook | 9th Mar 23
These pincushions are so cheery and summery. Fruit Cocktail is such a wonderful collection of colors and prints. i can’t wait to work with them. Thanks for sharing your process with us.
Michelle Nitengale | 9th Mar 23
I’m in love with the mini oranges since I made orange blossom. I might have to make one of those.
Linda sumler | 10th Mar 23
Can’t wait to make the pincushion. 🙂
Anita | 10th Mar 23
They are all so cute! Not sure which one I would want to make first!
Alicia | 10th Mar 23
I just had surgery and am “stuck” at home sewing! I’m hoping to get my blueberry quilt and all the pincushions done before I return to work!! Wish me luck!!!!
Pam Beevers | 10th Mar 23
Thank you so much for sharing the pincushion instructions! They are just adorable and I will definitely enjoy making them all! Just received my book and just love it 🍒🍊🍋🫐
Laurel | 10th Mar 23
Being a very slow machine piecer with too many beloved projects in the queue, I love these bite-sized pincushions. Susan’s math tips are invaluable for that! I just so happen to have a cute, mini charm pack of Fruit Salad to test these with (:
Diane Wilkinson | 10th Mar 23
My book came today,a recipe from a columnist in my local newspaper whom I have followed for 20+ years is in the book, and of course the recipe looks delish!