
FAIRYTALE PUMPKINS SEW ALONG: WEEK 5 + SPECIAL EXTRA PROJECT!
It’s the last week in our FAIRYTALE PUMPKINS sew along. Here is where we put all our rows together, add the outer borders, and prepare our tops for quilting!
I am so glad so many of you have joined us in making a mini quilt, table runner, and/or one of our larger sampler quilts. It truly is a joy to see your projects grow into fully-finished works of art (and heart)!
Be sure to read all the way to the bottom for our special project extra – courtesy of the lovely Susan of @thefeltedpear!

ASSEMBLY
- For the mini quilt, assembly instructions are listed on page 11.
- For the table runner, assembly instructions are listed on page 12.
- For the cream/”day” sampler, assembly instructions are listed on pages 12-13.
- For the grey ghost/”night” sampler, assembly instructions are listed on page 14.
QUILTING IDEAS
MINI QUILT – We chose a small crosshatch that really gives it a vintage vibe.

TABLE RUNNER – We chose the baptist fan design for some vintage flair.

CREAM/”DAY” SAMPLER – We chose a medium-sized, medallion, all-over pattern to tie this sampler together.

GREY GHOST/”NIGHT” SAMPLER – We chose custom quilting for this sampler that really elevates this soft grey background (BELLA DRIFTWOOD) and those cream pumpkins!

SPECIAL PROJECT EXTRA:
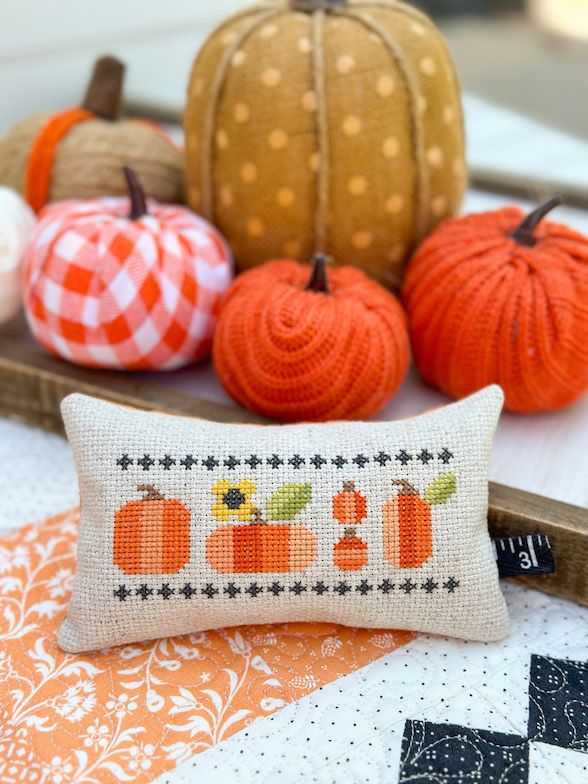
Cross Stitch Pumpkin Pincushion
Let’s hear straight from Susan on her process!
One of the goals I had for 2023 was to find a creative activity for me to do while waiting in the car for my teenage daughter. Between sports practices and meets, volunteer activities, and school carpool, my family is on the go a lot. At the same time, I find myself with a few spare minutes at every stop.
This is an easy time to for me to reach for my phone and spend a few minutes responding to email, calling Mom, or scrolling through Facebook to check in on all my Fig Tree Friends. These quick minutes can be so helpful for checking in with friends and family, but they have me dependent on being on my phone (or online), especially in places that don’t always have the best cell signal (all my fellow Cross Country families know what I mean). I was looking for an activity that was portable, didn’t require a bunch of supplies, and wouldn’t melt in the car – I live in Southern CA and it gets quite warm!
At a coffee date with two quilty friends, I shared my goal and they both encouraged me to give cross-stitch a try. I initially scoffed at their suggestion as I had tried cross stitching a couple of years ago and had a very hard time seeing where to stitch on the linen fabric. I quickly got frustrated and had another half-started craft project taking up space in my sewing room. They shared with me that supplies are much more readily available and are made of a higher quality than when I first tried things and that I should go for it.
I decided to give it a try and I sat down with some graph paper and played with the overall design of Joanna’s Fairytale Pumpkins pattern (available in PAPER and PDF). Once I had a basic idea of what I wanted to do, I uploaded the design into my program, printed out my chart and got started!
I had so much fun stitching away that I finished my project in two nights of hand stitching while waiting for my daughter on the trails and watching a movie with my husband. My friends were right! It was kind of addictive and I have all sorts of other ideas I can’t wait to stitch out!
If you would like to stitch one out for yourself, here are the details particular to this project:
- I stitched out my sample using DMC floss and DMC “Carolina Linen” 14 ct in color 1410. This fabric is not like linen, and I would have characterized it similar to Adia cloth.
- I made my stitches with (2) strands of floss.
- The project is 70 stitches wide by 40 stitches tall. This is roughly 4 ½” x 2” with my 14 ct. base fabric.
To turn your project into a pincushion or bowl filler:
- Stitch out your cross-stitch panel according to the chart. Once finished trim fabric with 1 1/8” extra on each side.
- Iron on fusible interfacing to the back of your project to keep your stitches secure and keep the filling from coming out.
- Follow the same process as THIS POST to finish off your project! I opted to add a black tag to the lower right-hand corner for an accent.
If you are new to cross-stitching (like me!) there are many general tutorials and YouTube Videos online that explain how to get started. You will be a stitching pro in no time!
Be sure to share your projects with Joanna and I on Instagram (@figtreeandco and @thefeltedpear) or in our FACEBOOK GROUP and let us know in the comments if there are any other Fig Tree patterns you would like to see stitched up!
-Susan
CLICK HERE TO DOWNLOAD YOUR CHART AND DMC LIST & INFO


Susan was also able to sew along on the quilty-side and made the mini; isn’t it the sweetest?!

We hope you enjoyed our sew along!
Reference Blog Posts:
FAIRYTALE PUMPKINS Pattern Official Intro…and a SEW ALONG!
Fairytale Pumpkins Sew Along – Week 1
Fairytale Pumpkins Sew Along – Week 2
Fairytale Pumpkins Sew Along – Week 3
Fairytale Pumpkins Sew Along – Week 4
-Joanna
Cathy | 21st Jul 23
Susan, the cross stitch pattern is adorable and I’m having a lot of fun stitching it. I’m curious to know about the program you used to generate the pattern. Are you able to share any information about that. Thanks!