
MODA BLOCKHEADS: WEEK #3
INTRODUCTION
Welcome back to Week #3! You guys are killing it with your blocks… well done! And I am loving seeing the little ones too even though we are not making that version.
~~~~~~~~~~~~~~~~~~~~~~~~~~~~~~~~~~~~~~
If you would like some more background info on the program, how it works or how we are planning on doing our version this year, please scroll back to the two previous posts for all kinds of info.
This below is our starter palette and we will be adding creams, reds and greens throughout the program so if you have a chance to add in some of your own from your stash… go for it. If you are looking for some more fabrics to mix in, we will offer bundles throughout as we have more fabrics to offer. For example our STITCHED collections should arrive in late April and we will for sure have some fabulous little color bundles to offer then.
We also have a fun option for a BACKING if you are interested in the shop now!


AS A QUICK REMINDER…
We have decided to just use 25 blocks which gives us a bit more flexibility in case we need to skip a week or a particular block doesn’t work with our setting. Our finished quilt will be app. 69″ square. We are working on our third 9″ block this week.

BLOCK #3: Kouign Amann By Laurie Simpson [of Minnick & Simpson]
I am loving these original names that designers are using… I am always eager to find out what it means!
To get the block directions for this week from Laurie… GO HERE.
HOW WE DID OURS
This time around Cynthia and I decided to feature a bit more of our favorite Fig Tree green in the little pindot from Fresh Fig Favorites.
FUSSY CUTTING
The center of this block is also a perfect place to do a little “fussy cutting”. If you have never heard the term “fussy cutting”, it means positioning a flower or other motif exactly where you want it in a portion of your block and cutting around it to make it fit precisely as you want it to show [and not as a part of strip cutting].
- The easiest way to do that is to make yourself a little tracing paper template [of you can use any lightweight paper or freezer paper as long as you can see through it to see the motif] the size that the piece needs to be cut- don’t forget that the seam allowances need to be included.
- Move the template around your fabric until you find the motif and the location you want.
- Trace your shape and cut or simply cut around it if you are feeling confident with your rotary cutter!
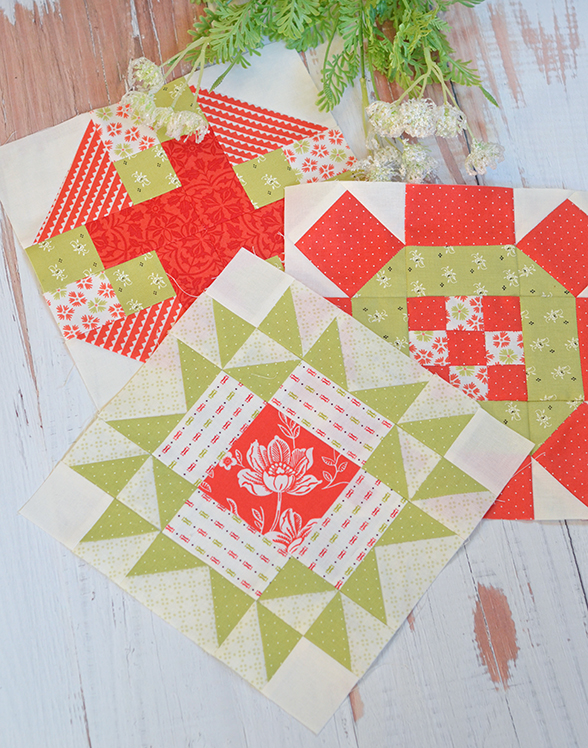
Cynthia did an amazing job of fussy cutting the center floral from my favorite floral from Fresh Fig Favorites. I never get enough of using that floral fabric!
DIRECTIONAL FABRICS
Second tip is about using directional fabrics. Personally I am not always so careful about these as some of my friends are but I always love the result of the careful cutting and layout that they do! Cynthia did such a wonderful job here with these that I couldn’t help but talk about it a little. When you are working with a directional print, you can choose whether you want the print to go vertically in the pieces [this is often the easier way to cut and line up and make sure you are straight] OR you could choose to have the pieces go horizontally like we did here. It is trickier and you will have to do a little bit of aligning to make sure your stripes are running exactly straight to your ruler before cutting. You would do this even if it makes the fabric a bit off-grain. The reason for that is that printed fabric is most often not perfectly aligned with the grain of the fabric like woven fabric is so often times a directional print will be slightly off and you have to make a decision on how you are going to cut it before you start.
- The floral is from Fresh Fig Favorites.
- The directional print is from Figs & Shirtings.
- The little green pindot is from Fresh Fig Favorites.
- The tiny cream and green print we used as a part of the background is from a collection by Brenda Riddle. I think it was Sophie but I am not totally sure!
- And then of course the ivory solid in the corners.

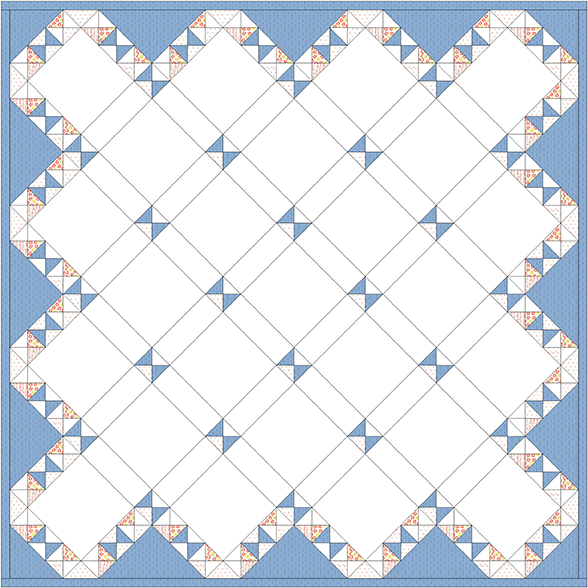
SOME MORE SETTING INFO
I have gotten a lot of questions about this so am just repeating all the setting info here below:
We have gotten a lot of questions about when we will have our setting directions up with cutting instructions so wanted to share with you guys that we won’t be doing that for at least a few weeks. We are going to work on getting at least several of the blocks done and laid out together and we will see how everything is coming together first.
We have FOR SURE decided on the blue chambray as our setting fabric. If you have decided to follow along with us and are using the same fabric [we have gotten some more in HERE], I recommend you either wash or at the very least spray starch the fabric well. Personally I would do both with this fabric. I am not really worried about the other fabrics and will lightly spray starch them before I work with them.
Normally I am not a washer of fabrics but with the chambray/crossweave fabrics I have done that sometimes to make sure I don’t get any bleeding down the road. Wash with color catchers to make sure the fabric is not bleeding. Also wash the fabric on the same temperature that you would potentially wash the quilt on.
We will see you guys next Wednesday with Block #4.
For now, be sure to follow us on INSTAGRAM and join us in our FACEBOOK GROUP for all kinds of Fig Tree fun!
See you soon, Joanna
Moda Blockheads 4
Introduction
Week 1
Week 2
Week 3
Week 4
Week 5
Week 6
Week 7
Week 8
Week 9
Week 10
Week 11
Week 12
Week 13
(We Skipped Week 14!)
Week 15
Week 16
naturesquilt | 15th Apr 22
Love your white rose with red background, looking forward to see the finished quilt (haven’t seen it on your instagram page yet).
thanks
Joanne